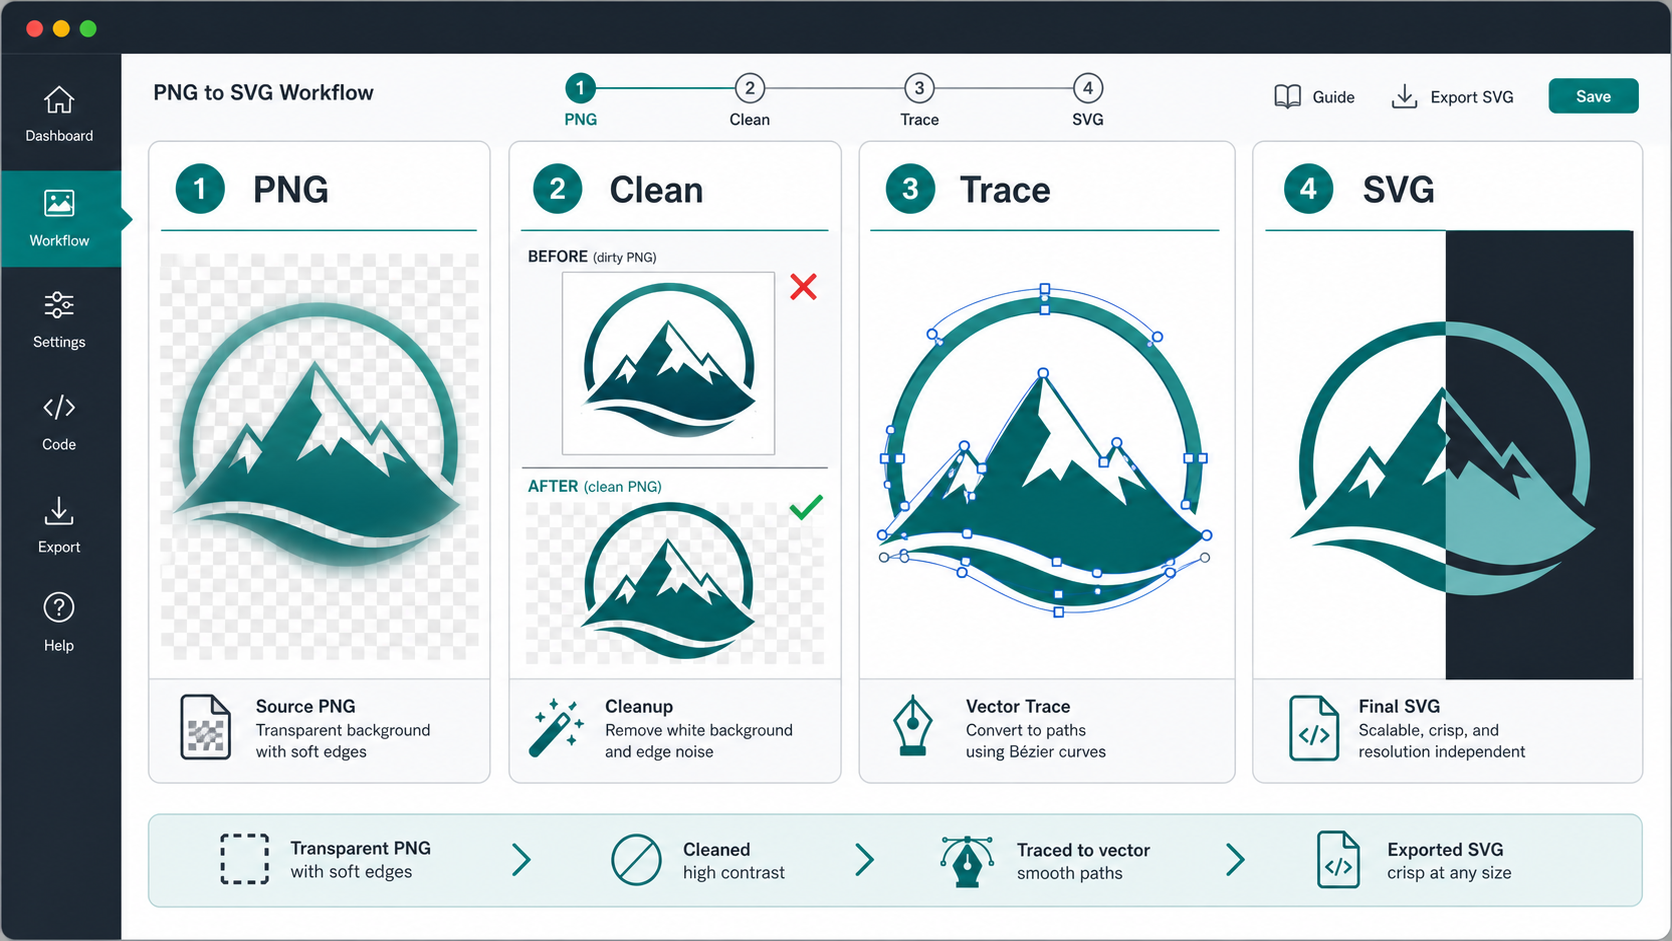
You remove the background from a logo, download a transparent PNG, run it through a converter, and then the SVG comes back with a white square, fuzzy edge fragments, or hundreds of tiny paths around the outline.
That is the painful part: transparency is easy to see in a preview, but vector conversion does not trace "what you meant." It traces pixels. If the transparent PNG still has off-white edge pixels, a leftover matte, shadow dust, or a hidden canvas, those details can become real SVG shapes.
Use this fast rule before converting: a transparent PNG should look clean on black, white, and checkerboard backgrounds before you turn it into SVG. If it only looks clean on one background, fix the raster file first.
Can you convert a transparent PNG to a transparent SVG?
Yes. You can convert a transparent PNG to a transparent SVG when the PNG has real alpha transparency and the artwork is simple enough to trace into clean vector paths. The transparent background itself should not become an SVG element; only the visible logo, icon, text, or illustration should be vectorized.
A transparent PNG is a raster image where some pixels have an alpha value that makes them fully or partly see-through. SVG is different: it stores shapes, paths, fills, strokes, and coordinates. The W3C PNG specification defines PNG transparency through alpha data, while MDN describes SVG as an XML-based vector graphics format.
That difference is why the cleanup step matters. The converter has to decide which visible pixels become vector geometry and which pixels should disappear.
For a quick first pass, upload the cleaned file to Image to SVG. If the file is specifically a PNG logo or icon, the more focused PNG to SVG converter settings guide explains how color count, smoothing, and noise removal affect the result.
Why does a transparent PNG become an SVG with a white background?
A transparent PNG becomes an SVG with a white background when the background was not actually transparent, the PNG was flattened onto a white matte, or the converter traced pale background pixels as artwork. Sometimes the SVG is fine and only the viewer is showing a white preview canvas.
Check these causes before editing the SVG:
| Symptom | Likely cause | Fast fix |
|---|---|---|
| Perfect white rectangle behind the logo | PNG was flattened on white | Remove the background before conversion |
| Thin white halo around dark artwork | White matte pixels around alpha edges | Defringe or clean the edge before tracing |
| Checkerboard appears inside the SVG | Checkerboard preview was exported as pixels | Export the image again without preview background |
| Background appears only in one app | Viewer canvas is white | Test on a dark page or checkerboard preview |
| Hundreds of pale shapes around edges | Alpha noise was traced | Increase noise cleanup and reduce colors |
Do not start by deleting random SVG paths. First prove whether the problem is in the PNG, the converter settings, or the preview app.
What should you check before converting transparent PNG to SVG?
Check the alpha channel, edges, crop, contrast, resolution, and color palette before converting a transparent PNG to SVG. These six checks prevent most white boxes, halos, bloated paths, and bad logo traces.
Use this pre-conversion checklist:
- Place the PNG on a black background and inspect the edge.
- Place it on a white background and inspect the edge again.
- Place it on a checkerboard background to confirm true transparency.
- Crop extra transparent space around the artwork.
- Remove drop shadows unless they are essential to the design.
- Reduce near-duplicate colors around anti-aliased edges.
- Export at the highest resolution available.
- Avoid converting photos, complex textures, and tiny raster text.
If the PNG fails the black-background test, it often has a light matte. If it fails the white-background test, it may have dark edge dust or leftover shadow. If it fails the checkerboard test, it may not be transparent at all.
The broader cleanup workflow in Prepare an Image for SVG Conversion is useful when the source is noisy, cropped badly, or saved from a screenshot.
How do you remove the white box before PNG to SVG conversion?
Remove the white box before PNG to SVG conversion by making the background fully transparent in the raster file, not by hoping the vectorizer ignores it. A converter cannot always know whether a white rectangle is a background, a badge shape, or part of the design.
Use this workflow:
- Open the PNG in an image editor with alpha support.
- Select the white or solid background area.
- Delete it to transparency, not to another color.
- Zoom into the edge and remove leftover fringe pixels.
- Export as PNG with transparency enabled.
- Test the export on black, white, and checkerboard backgrounds.
- Convert the cleaned PNG with Image to SVG.
If the file is already an SVG with a background rectangle, use How to Make SVG Background Transparent instead. That guide covers the vector-side cleanup. This page is about fixing the raster input before tracing.
Should you keep soft shadows and semi-transparent pixels?
Keep soft shadows and semi-transparent pixels only when they are essential to the artwork. For logos, UI icons, decals, and cut files, shadows usually make the SVG worse because they turn into many layered shapes or embedded raster effects.
Use this decision table:
| Artwork type | Keep transparency details? | Better SVG choice |
|---|---|---|
| One-color logo | No | Solid paths with clean edges |
| App or UI icon | Usually no | Simple fills, maybe strokes |
| Sticker or badge | Sometimes | Keep intentional border shape, remove shadow dust |
| Hand-drawn line art | No | High-contrast lines on transparent background |
| Product photo cutout | No | Keep as PNG/WebP, or redraw a simplified illustration |
| Decorative illustration | Maybe | Convert only if path count stays reasonable |
SVG can represent opacity, masks, gradients, and filters, but those features do not automatically mean a traced PNG is production-ready. The W3C SVG 2 specification supports a rich graphics model; the practical question is whether the output stays editable, lightweight, and visually faithful.
For most transparent PNG logo conversions, remove shadows first and re-add effects later in CSS or a design tool if you really need them.
What settings work best for transparent PNG to SVG?
The best transparent PNG to SVG settings are conservative: low color count, moderate smoothing, background ignored or transparent, noise removal enabled, and path simplification applied after the visual result is correct. The goal is a clean SVG, not a perfect record of every edge pixel.
Start here:
| Setting | Safer starting point | Why it helps |
|---|---|---|
| Color count | Match real artwork colors | Prevents alpha-edge colors from becoming extra fills |
| Smoothing | Low to medium | Cleans stair-steps without rounding corners too much |
| Noise removal | Medium | Drops speckles and leftover background dust |
| Background handling | Transparent / ignore background | Prevents white rectangles from being traced |
| Path simplification | After conversion | Reduces points once the shape is visually right |
If the SVG has halos, reduce colors and clean the PNG edge. If the SVG has jagged corners, use a larger source or slightly more smoothing. If the SVG is huge, the source may be too complex for vector conversion.
How do you test the SVG after conversion?
Test the SVG by viewing it on light, dark, and transparent backgrounds, then checking whether it scales cleanly at the sizes where you will use it. A transparent SVG is not finished just because the preview looks good at 600px wide.
Run this quick QA pass:
- Open the SVG on a dark background to catch white halos.
- Open it on a light background to catch dark edge dust.
- Test it at 24px, 64px, 256px, and a large size.
- Confirm there is no full-canvas background rectangle.
- Check that the
viewBoxfits the artwork without huge empty space. - Make sure the SVG does not contain an embedded raster image.
- Minify only after the visual result is approved.
If the shape is right but the file is heavy, use SVG Minifier or read the SVG minifier guide. If the shape is wrong, go back to the PNG instead of repeatedly minifying a bad trace.
When is transparent PNG to SVG the wrong workflow?
Transparent PNG to SVG is the wrong workflow when the PNG is photographic, blurry, texture-heavy, shadow-heavy, or full of tiny raster text. Those files may technically convert, but the result often becomes a large SVG that is harder to edit than the original image.
Choose the better path:
| Source file | Best move | Reason |
|---|---|---|
| Clean transparent logo PNG | Convert to SVG | Clear shapes and limited colors trace well |
| Small blurry logo from a website footer | Recreate or find source art | The converter cannot infer missing detail |
| Product photo with removed background | Keep PNG/WebP | Photos are usually better as raster images |
| Sticker with flat colors | Convert, then simplify | Good candidate if shadows are controlled |
| Screenshot of a logo | Find original or recreate | Screenshot artifacts become vector junk |
| Brand-critical master logo | Convert, inspect, then manually clean | Permanent assets deserve tighter QA |
If you are deciding between raster and vector from scratch, read Raster vs Vector: Complete Comparison. If your file is already a vector but has messy paths, use the SVG path optimizer guide after cleanup.
What is the fastest workflow for a transparent logo SVG?
The fastest workflow is to clean the PNG edge first, convert once, inspect the SVG on multiple backgrounds, then edit only the specific problem you see. Randomly changing every converter setting wastes time and usually makes the file less predictable.
Use this workflow:
- Start with the largest transparent PNG available.
- Test it on black, white, and checkerboard backgrounds.
- Remove white matte, edge halos, shadow dust, and accidental background pixels.
- Crop the transparent canvas around the artwork.
- Convert with Image to SVG or PNG to SVG.
- Open the SVG in SVG Editor.
- Delete accidental background shapes if any remain.
- Test the SVG in the real layout where it will be used.
- Minify the final file.
For logos that started as AI-generated images, also read AI Logo to SVG Converter Guide. AI logo exports often include soft glows, texture, and fake transparency that need cleanup before vectorization.
If the transparent PNG is specifically a brand mark, the remove background from logo workflow gives the stricter logo version of this process: edge checks, favicon tests, and when to keep PNG instead of forcing a messy SVG.
FAQ
Can a transparent PNG become a transparent SVG?
Yes. A transparent PNG can become a transparent SVG when the background is truly alpha-transparent and the converter traces only the artwork. If the source contains a white box, semi-transparent edge pixels, or shadow noise, clean those pixels before vector conversion.
Why did my transparent PNG turn into an SVG with a white background?
A transparent PNG usually turns into an SVG with a white background because the file was not actually transparent, the preview app added a white canvas, or the converter traced a near-white background as a real vector shape.
Should I remove the background before converting PNG to SVG?
Yes, remove the background before converting PNG to SVG when the final logo, icon, sticker, or graphic needs transparency. Background removal after conversion is possible, but it is slower when the background has already become many vector paths.
What is the best transparent PNG for SVG conversion?
The best transparent PNG for SVG conversion is high resolution, tightly cropped, high contrast, low noise, and limited to the colors that belong in the final vector. Logos, icons, line art, badges, and flat illustrations work better than photos.
How do I avoid white halos in a converted SVG?
Avoid white halos by testing the transparent PNG on a dark background before conversion, removing matte pixels around the edge, reducing near-white edge colors, and converting with fewer colors. If the halo appears after conversion, clean the source PNG and trace again.
Bottom line
Transparent PNG to SVG conversion works best when the transparent PNG is already clean. Remove the white box, clean the alpha edge, crop the canvas, simplify colors, and test the result on multiple backgrounds before you trust it.
Start with Image to SVG, then inspect the result in SVG Editor. If the output is messy, fix the PNG source first. That is faster than repairing hundreds of accidental vector paths later.
Create your own SVG graphics with AI
Describe what you need, get a production-ready vector in seconds. No design skills required.
About This Article
This article was written by SVG Genie Team based on hands-on testing with SVG Genie's tools and years of experience in vector design and web graphics. All recommendations reflect real-world usage and are reviewed by the SVG Genie editorial team for accuracy.
About the Author
SVG Genie Team
SVG Design Expert & Technical Writer at SVG Genie
SVG Genie Team is a vector design specialist and technical writer at SVG Genie with years of hands-on experience in SVG tooling, AI-assisted design workflows, and web graphics optimization. Their work focuses on making professional vector design accessible to everyone.
More articles by SVG Genie Teamarrow_forward