The annoying version of Figma SVG export is not a total failure. The file opens. The icon is there. But the stroke is wrong: a 1.5 px line turns heavy, rounded caps become square, dashed lines go solid, outside strokes get clipped, or a React component ignores the color prop you expected to work.
The fast rule:
Fix Figma SVG stroke problems before minifying. First decide whether the stroke should remain an SVG stroke or become filled geometry, then check the frame bounds, viewBox, stroke attributes, CSS overrides, and React conversion.
If the whole export is blank or clipped, start with the broader Figma SVG export troubleshooting guide. If gradients or masks are failing, use the Figma SVG gradient fix guide. If the file renders correctly but the markup is messy, clean it with the Figma SVG export clean code guide.
Why do Figma SVG strokes change after export?
Figma SVG strokes change after export when the visual stroke in Figma is not represented the same way in the final SVG. Figma may export strokes as filled shapes, simplify stroke geometry, crop lines with a tight frame, or produce attributes that later get changed by React, CSS, CMS sanitizers, or SVG optimization.
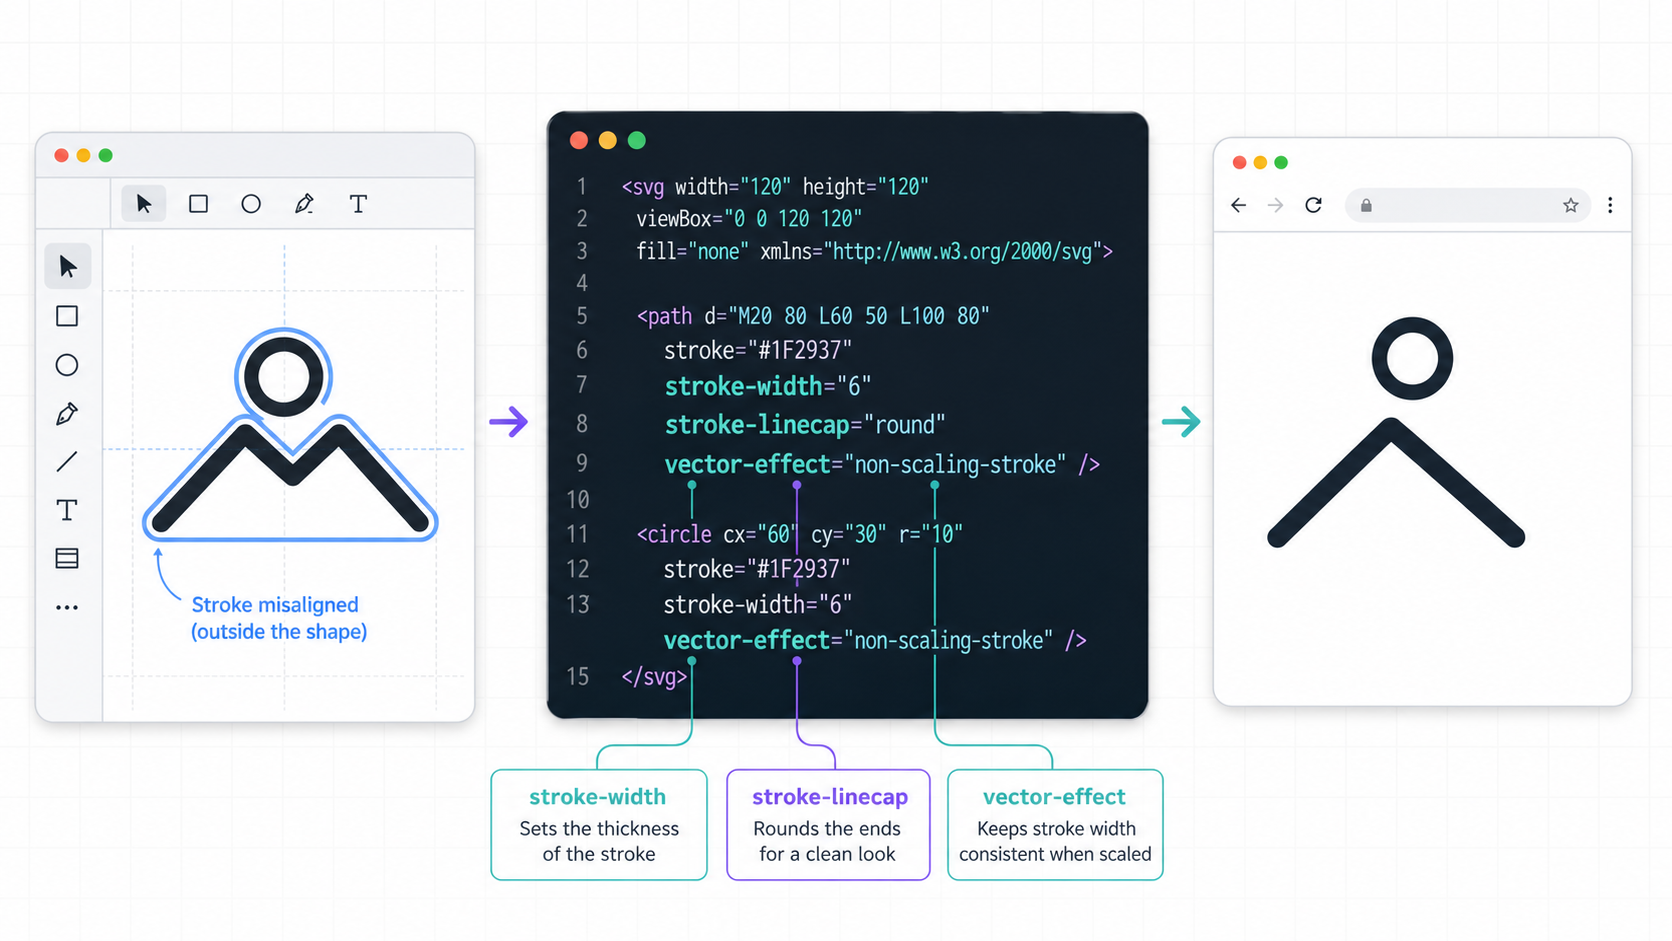
An SVG stroke is the painted outline of a path, shape, or text element. It is controlled by attributes such as stroke, stroke-width, stroke-linecap, stroke-linejoin, stroke-dasharray, and sometimes vector-effect. A stroke is different from a filled path that merely looks like a line.
Figma's own export documentation says SVG is a code-friendly vector format for logos, icons, and responsive illustrations, but it also notes an important trap: Figma exports strokes as fills. It also lists SVG-specific settings such as Outline text and Simplify stroke, and notes that Figma supports SVG export at 1x.
Useful references:
The practical question is not "did Figma export SVG?" It is "did the exported SVG preserve the line behavior I need?"
What is the fastest Figma SVG stroke troubleshooting checklist?
The fastest checklist is to compare the Figma source, the standalone exported SVG, and the final embed separately. If the stroke is wrong in the standalone file, fix the Figma selection or export settings. If it only breaks in the app, inspect CSS, React conversion, IDs, optimization, and the embed method.
Use this table first:
| Symptom | Most Likely Cause | First Fix |
|---|---|---|
| Stroke is cut off | Frame or viewBox is too tight | Expand the export frame or repair the viewBox |
| Rounded caps become square | stroke-linecap was removed or converted | Preserve cap attributes or keep the stroke as geometry |
| Dashed line becomes solid | stroke-dasharray was removed | Restore dash attributes and avoid aggressive optimization |
| Line gets thicker when scaled | Stroke scales with the SVG | Test vector-effect="non-scaling-stroke" |
| Color prop does not work in React | Stroke became filled paths or hardcoded color | Replace fixed colors with currentColor where safe |
| Icon looks blurry at small sizes | Half-pixel alignment or scaled stroke | Align to the pixel grid and test at final size |
| Stroke disappears in CMS preview | Sanitizer stripped attributes or inline style | Use a simpler SVG or safer embed method |
Then search inside the SVG:
stroke=
stroke-width
stroke-linecap
stroke-linejoin
stroke-dasharray
vector-effect
fill=
viewBox
clipPath
If the SVG contains no stroke attributes and only long <path fill="..."> shapes, the line was converted into filled geometry. That can be fine for a final logo, but it is not the same as an editable stroke.
Should you keep strokes or convert them to filled paths?
Keep strokes when the line needs to stay editable, themeable, animated, dashed, or responsive to CSS. Convert strokes to filled paths when the final shape must look identical everywhere and nobody needs to change stroke width, caps, joins, dashes, or color behavior later.
Use this decision table before export:
| Asset Type | Keep as Stroke? | Convert to Fill? | Why |
|---|---|---|---|
| App icon system | Usually | Sometimes | Strokes are easier to theme with currentColor |
| Final brand mark | Sometimes | Usually | Visual consistency matters more than editability |
| Dashed process diagram | Yes | No | Dashes should remain easy to adjust |
| Thin line illustration | Usually | Maybe | Test at small sizes before locking geometry |
| Sticker or marketplace SVG | Maybe | Often | Filled paths can be more portable across editors |
| Animated loader | Yes | No | Stroke dash and line length are part of the animation |
| Tiny favicon-like mark | Maybe | Often | Filled geometry can avoid renderer differences |
The mistake is mixing the two models accidentally. A filled-path export may look correct, but a developer cannot later do this:
<path
  d="M4 12h16"
  stroke="currentColor"
  stroke-width="2"
  stroke-linecap="round"
/>
If Figma has turned the line into a filled path, you may see something closer to this:
<path
  d="M4 11h16v2H4z"
  fill="#111827"
/>
That second shape can still be a valid SVG. It is just no longer an SVG stroke. For an icon library, that distinction matters.
How do you fix a Figma SVG stroke that is cut off?
Fix a cut-off Figma SVG stroke by expanding the export frame, checking whether the stroke sits centered or outside the path, disabling accidental clipping, and preserving a viewBox that includes the full visible edge. Do this before optimizing, because minification cannot restore missing artwork.
In Figma, check:
- Select the full component, not a nested vector inside it.
- Expand the frame until outside strokes, shadows, blurs, and rotated lines fit.
- Check whether Clip content is cropping the visual edge.
- Add export padding when the line touches the frame edge.
- Re-export SVG at 1x and open the file directly in a browser.
In the SVG, compare the geometry with the viewBox:
<svg viewBox="0 0 24 24" xmlns="http://www.w3.org/2000/svg">
  <path
    d="M1 12h22"
    stroke="currentColor"
    stroke-width="2"
    stroke-linecap="round"
  />
</svg>
That line can visually extend beyond x=1 and x=23 because rounded caps add visible paint at both ends. If the viewBox or frame is too tight, the ends can appear shaved off. The same thing happens with thick strokes on rectangles, circles, diagonal lines, and icons that rely on outside strokes.
For broader viewBox repair, use the SVG icon cut off fix guide. If you need to change the canvas visually, open the file in SVG Editor and test the result at the final icon size.
How do you keep SVG stroke weight from changing when resized?
SVG stroke weight changes when resized because strokes normally scale with the rest of the vector. If an icon doubles in size, a 2 px stroke usually becomes visually thicker too. When the line should keep a constant screen width, test vector-effect="non-scaling-stroke" and verify support in the final renderer.
Example:
<svg viewBox="0 0 24 24" width="96" height="96">
  <path
    d="M4 12h16"
    fill="none"
    stroke="currentColor"
    stroke-width="2"
    stroke-linecap="round"
    vector-effect="non-scaling-stroke"
  />
</svg>
This tells supporting renderers not to scale the stroke width with the shape. It is useful for maps, diagrams, technical line art, and responsive UI decorations where the line should stay consistent.
Do not use it blindly for every icon. Many icon systems expect the stroke to scale with the icon size. A 16 px icon and a 64 px illustration may need different line weights to look intentional.
Decision rule:
- Use normal scaling for icon sets, logos, and illustrations that should scale proportionally.
- Test non-scaling strokes for maps, diagrams, charts, and responsive decorative lines.
- Avoid non-scaling strokes if the SVG will be converted through tools that ignore or strip
vector-effect. - Always preview the final embed, not only the raw file.
Why do Figma SVG strokes lose rounded caps, joins, or dashes?
Figma SVG strokes lose caps, joins, or dashes when the exported file converts the stroke into fills, an optimizer removes stroke attributes, or React/CSS rewriting changes how the line is painted. Rounded caps, miter joins, and dashed patterns are stroke behavior, so they disappear when the stroke stops being a stroke.
A healthy editable stroke may look like this:
<path
  d="M4 6h16M4 12h16M4 18h16"
  fill="none"
  stroke="currentColor"
  stroke-width="2"
  stroke-linecap="round"
  stroke-linejoin="round"
/>
A dashed line may need:
<path
  d="M4 12h16"
  fill="none"
  stroke="#2563eb"
  stroke-width="2"
  stroke-dasharray="4 3"
  stroke-linecap="round"
/>
If the line becomes filled geometry, stroke-linecap and stroke-dasharray are no longer the controls. You would have to edit the path shape itself.
Before optimizing, keep a small checklist:
- Does the line still use
stroke, or did it becomefill? - Is
fill="none"present where needed? - Did
stroke-linecapsurvive? - Did
stroke-linejoinsurvive? - Did
stroke-dasharraysurvive? - Does the icon still look right at 16, 24, 32, and 48 px?
- Does the same SVG work on light and dark backgrounds?
If the stroke is part of an animation, be extra conservative. Stroke animations often depend on stroke-dasharray, stroke-dashoffset, and path length. A cleaner-looking filled path can break the entire motion system.
How do you fix Figma SVG strokes in React?
Fix Figma SVG strokes in React by converting SVG attributes to JSX names, preserving viewBox, keeping useful stroke attributes, replacing hardcoded colors with currentColor only where intended, and checking whether the source export still uses strokes or has already converted the line into fills.
Raw SVG:
<svg viewBox="0 0 24 24">
  <path
    d="M4 12h16"
    fill="none"
    stroke="#111827"
    stroke-width="2"
    stroke-linecap="round"
  />
</svg>
React component:
export function DividerIcon({ title = "Divider icon", className }: { title?: string; className?: string }) {
  return (
    <svg viewBox="0 0 24 24" role="img" aria-label={title} className={className}>
      <path
        d="M4 12h16"
        fill="none"
        stroke="currentColor"
        strokeWidth={2}
        strokeLinecap="round"
      />
    </svg>
  );
}
What changed:
stroke-widthbecamestrokeWidth.stroke-linecapbecamestrokeLinecap.- The hardcoded color became
currentColor. - The
viewBoxstayed in place. - The component exposes styling through
className.
For a batch of icons, use SVG to React, then inspect the output. Automated conversion helps with JSX syntax, but it cannot always decide whether a filled path should be rebuilt as a stroke, whether a brand color should become currentColor, or whether a stroke should be non-scaling.
How do you optimize a Figma SVG stroke without breaking it?
Optimize a Figma SVG stroke only after the raw export renders correctly. Use conservative settings, preserve the viewBox, compare before and after, and avoid cleanup that removes stroke attributes, dash arrays, accessibility labels, or definitions required by masks, clips, gradients, and filters.
Use this workflow:
- Duplicate the Figma source.
- Export the smallest correct frame as SVG.
- Open the raw SVG directly in Chrome, Firefox, or Safari.
- Check whether strokes are still strokes or filled paths.
- Fix frame, clipping, viewBox, and color issues first.
- Run SVG Optimizer or SVG Minify with conservative settings.
- Compare the raw and optimized file side by side.
- Test the SVG in its final location:
<img>, inline React, CSS background, CMS, or download.
Avoid this trap: "the optimized file is smaller, so it must be better." A 900 byte icon with square caps, missing dashes, or broken theme colors is not better than a 1.4 KB icon that renders correctly.
For generated or raster-sourced assets, the better path may be to rebuild instead of repair. If the source is a PNG, JPG, screenshot, or AI-generated mockup, use Image to SVG or PNG to SVG, then clean the resulting vector in the editor.
What is the best workflow for reliable Figma SVG strokes?
The best workflow is to decide the stroke model before export, keep an editable Figma source, export a tight but not clipped frame, inspect the raw SVG, convert to React or optimize only after the visual is correct, and test the asset at the sizes where it will actually ship.
Use this final checklist:
- Decide: editable SVG stroke or locked filled geometry.
- Keep an editable source file before outlining, flattening, or simplifying.
- Export a frame that includes the full visible stroke.
- Preserve
viewBox. - Check
stroke-width, caps, joins, dashes, andfill="none". - Replace fixed colors with
currentColoronly for themeable icons. - Use
vector-effect="non-scaling-stroke"only when constant line width is required. - Optimize after the file renders correctly.
- Test in the final embed method.
If you already have a messy export, start with SVG Editor to inspect the canvas and geometry. If the code is valid but too noisy, run SVG Optimizer. If the asset belongs in a React codebase, convert it with SVG to React and review the stroke attributes before shipping.
Why do Figma SVG strokes change after export?
Figma SVG strokes change after export because the visual stroke may be exported as filled geometry, simplified, clipped by the frame, or rewritten later by CSS, React, a sanitizer, or an optimizer. Check the raw exported file before blaming your app.
How do I keep Figma SVG strokes editable?
Keep the original Figma source, avoid destructive simplification when line behavior matters, and confirm the SVG still contains stroke, stroke-width, caps, joins, and dashes. Once a stroke becomes a filled path, it is no longer editable as a normal SVG stroke.
Why is my Figma SVG stroke cut off?
The export frame or viewBox is usually too tight. Centered and outside strokes can extend beyond the path's coordinates, and rounded caps add visible paint at the ends. Expand the frame or repair the viewBox before optimizing.
Should I use non-scaling stroke in SVG?
Use vector-effect="non-scaling-stroke" when a line should keep the same screen width as the SVG scales, such as maps or technical diagrams. For normal icons and logos, proportional stroke scaling is often the expected behavior.
Can SVG Genie fix Figma stroke SVGs?
Yes. Use SVG Editor to inspect and repair the canvas, SVG Optimizer to clean the file conservatively, and SVG to React when the final asset is a component.
Create your own SVG graphics with AI
Describe what you need, get a production-ready vector in seconds. No design skills required.
About This Article
This article was written by SVG Genie Team based on hands-on testing with SVG Genie's tools and years of experience in vector design and web graphics. All recommendations reflect real-world usage and are reviewed by the SVG Genie editorial team for accuracy.
About the Author
SVG Genie Team
SVG Design Expert & Technical Writer at SVG Genie
SVG Genie Team is a vector design specialist and technical writer at SVG Genie with years of hands-on experience in SVG tooling, AI-assisted design workflows, and web graphics optimization. Their work focuses on making professional vector design accessible to everyone.
More articles by SVG Genie Teamarrow_forward