You have a PNG logo, icon, sticker, label, or small graphic. It looks fine at the size it was exported. Then the real job appears: the file needs to work on a retina website, a print mockup, a dark-mode header, a Cricut project, or a client handoff.
That is when "just use the PNG" stops working.
The fastest decision rule is this:
Convert a PNG to vector when the image has clear shapes, limited colors, and a real need to scale. Keep it raster or recreate it when the PNG is photographic, blurry, gradient-heavy, or full of tiny texture.
That rule saves time because PNG-to-vector conversion is not magic upscaling. A good converter has to decide which pixels are real design shapes and which pixels are edge noise, shadows, background, or compression damage.
What does PNG to vector mean?
PNG to vector means converting a pixel-based PNG file into scalable vector geometry. The vector output is usually SVG for websites and apps, but it can also be AI, EPS, or PDF when the asset is going into a print or design-suite workflow.
PNG to vector conversion is the process of interpreting raster pixels and rebuilding the visible artwork as paths, shapes, fills, strokes, and curves. PNG stores a fixed grid of pixels. Vector formats store drawing instructions. That is why a clean vector can scale from a 24px icon to a poster without becoming blurry.
Useful format references:
The important part is the word "interpret." When a black mark on a transparent background has gray edge pixels, a human sees one clean mark. A bad vectorizer may see black, dark gray, medium gray, light gray, alpha pixels, and small islands. Those can become separate vector paths unless the workflow cleans them up.
When should you convert PNG to vector?
Convert PNG to vector when the asset needs to stay sharp at many sizes, be edited as paths, recolored cleanly, animated, cut, printed, or embedded as a lightweight web graphic. The best candidates are simple graphics with clear edges and limited color.
Use PNG-to-vector conversion for:
- logos and brand marks
- UI icons and app icons
- line art and silhouettes
- badges, labels, stamps, and stickers
- flat illustrations with a small palette
- diagrams, symbols, and simple infographics
- cut files for vinyl, Cricut, or laser workflows
Do not force conversion for every PNG. Keep the PNG, WebP, or JPG when the image is a photo, product shot, textured painting, soft gradient, or screenshot with dense detail. Those files can technically be traced, but the result is often a bloated SVG that looks worse and is harder to edit.
If you are still deciding whether the source belongs in raster or vector, read Raster vs Vector: Complete Comparison first. If the source is clearly a logo, the more specific AI Logo to SVG Converter Guide covers brand cleanup and favicon testing.
Which vector format should you choose after converting PNG?
Choose SVG for web, app, icon, and most online workflows. Choose AI, EPS, or PDF only when a printer, designer, marketplace, or production vendor specifically requires that format. For most people searching for PNG to vector, SVG is the practical output.
| Output Format | Best For | Use It When |
|---|---|---|
| SVG | Websites, apps, icons, editable web assets | You need a scalable file that works in browsers |
| AI | Adobe Illustrator handoff | A designer needs to keep editing in Illustrator |
| EPS | Legacy print/vendor workflows | A printer explicitly requests EPS |
| Print proofing and mixed vector/raster documents | The final deliverable is print-oriented | |
| DXF | Cutting, CAD-like production | The vendor asks for cut paths, not web SVG |
For a website, SVG is usually the right answer because it is built for browsers, supports CSS styling, can be minified, and works well for logos and icons. MDN documents SVG as an XML-based vector format with broad browser support, which is why it became the default web vector format.
For quick web output, start with SVG Genie's PNG to SVG converter. If the file is not strictly PNG, use Image to SVG for broader format support.
What kinds of PNG files convert cleanly?
PNG files convert cleanly when the artwork already looks like vector art: sharp edges, strong contrast, limited colors, no soft shadows, no texture, and enough resolution for the converter to detect the intended shapes.
Use this quality check before uploading:
| Source PNG | Conversion Outlook | Best Move |
|---|---|---|
| Transparent logo, 2-6 colors | Strong | Convert to SVG, then inspect paths |
| UI icon, high contrast | Strong | Convert with low color count |
| Black line art on white | Strong | Convert or trace as one-color SVG |
| Sticker with flat colors | Good | Convert, then simplify palette |
| App icon with gradients | Mixed | Convert only if you need editable shapes |
| Screenshot of a logo | Weak | Try conversion, but expect cleanup |
| Photo or product image | Poor | Keep raster or recreate a simplified vector |
| Tiny blurry PNG | Poor | Find a better source or recreate |
The painful cases are often "PNG" in name only. A client may send a PNG that came from a compressed JPG, a screenshot, or a Canva export with shadows and effects. The extension changed, but the damage stayed inside the pixels.
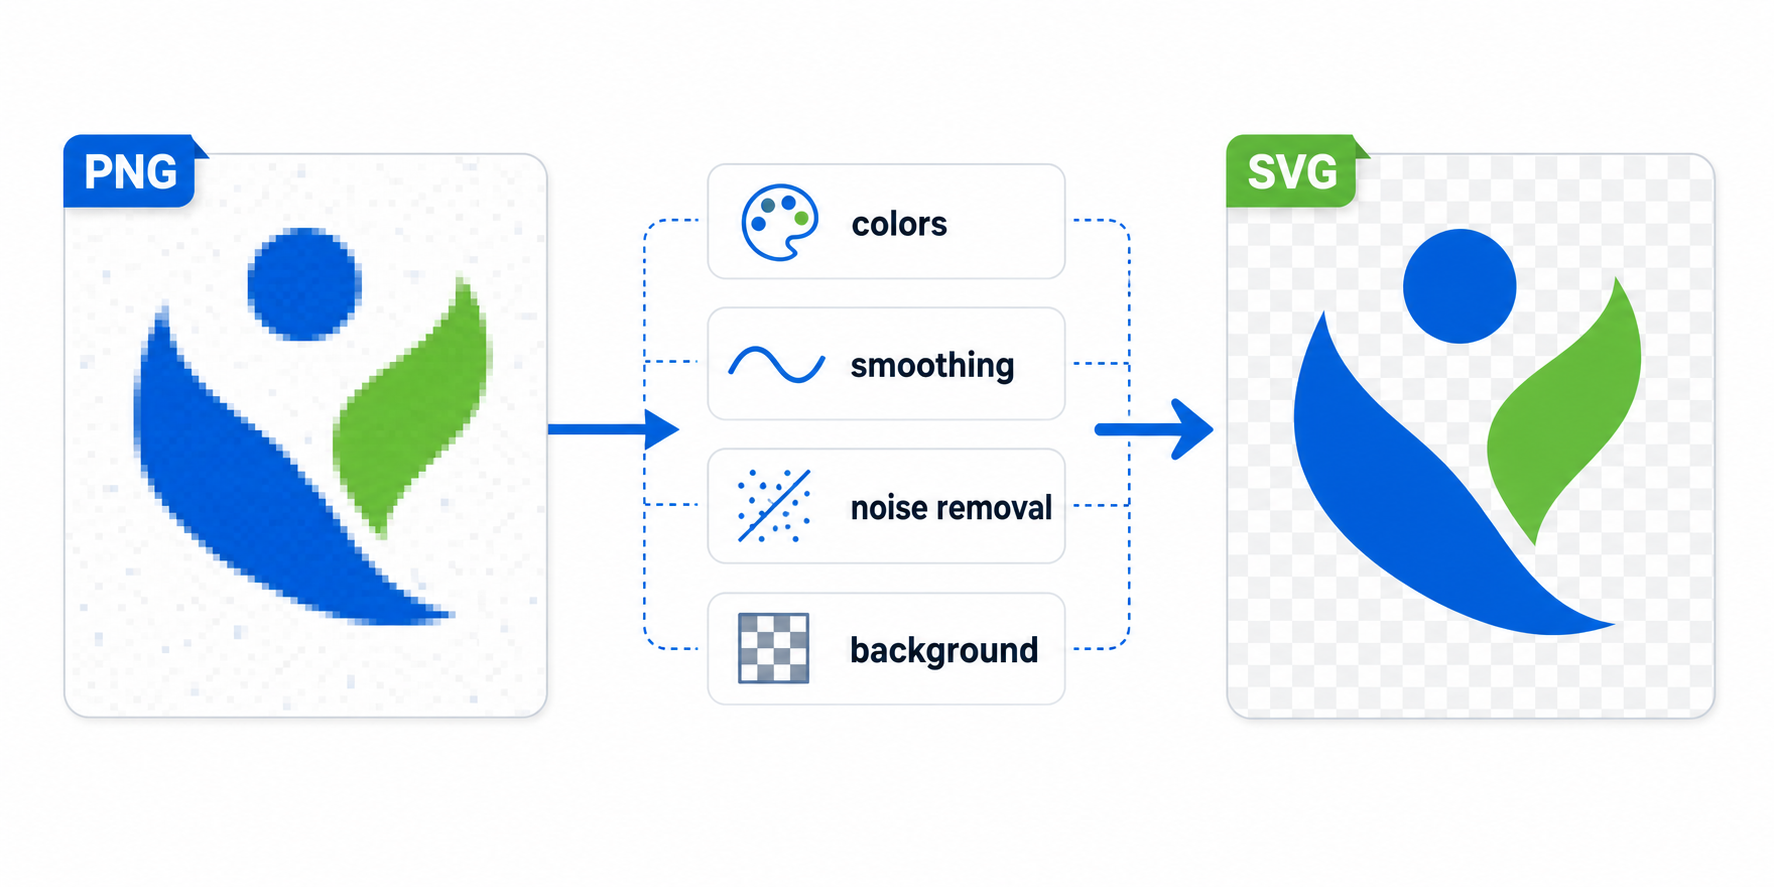
How do you convert PNG to vector without messy paths?
The clean workflow is: start with the best source PNG, remove unwanted background, reduce noise, convert with conservative settings, inspect the SVG, simplify paths, and test the file at real sizes. Do not judge the result only from the converter preview.
Use this fast checklist:
- Start with the largest PNG available.
- Remove background if it should not become part of the vector.
- Crop tight to the artwork bounds.
- Increase contrast if edges are faint.
- Avoid adding shadows, glow, texture, or gradients before conversion.
- Convert to SVG.
- Inspect the output at 24px, 64px, 256px, and large print-preview size.
- Remove accidental background shapes and tiny junk paths.
- Run the file through SVG Minify.
- Recolor or adjust paths in SVG Editor if needed.
For one-off PNG logos and icons, PNG to SVG is the direct route. For a folder of repeated private conversions, the desktop workflow in How to Convert PNG to SVG on Desktop is usually faster and safer than uploading files one at a time.
Why does PNG to vector conversion look bad?
PNG to vector conversion looks bad when the converter traces visual noise instead of design intent. Common causes include low resolution, anti-aliasing, JPG artifacts, transparent-edge pixels, shadows, gradients, tiny text, and too many similar colors.
Here is the practical diagnosis table:
| Symptom | Likely Cause | Fix |
|---|---|---|
| Thousands of tiny paths | Noise, texture, or too many colors | Reduce colors, increase noise removal |
| Jagged diagonal edges | Low-res PNG or weak smoothing | Use larger source, add moderate smoothing |
| White rectangle behind logo | Background was traced | Remove background before conversion |
| Colors almost match but not exactly | Anti-aliasing became separate fills | Simplify palette, then recolor |
| Text looks warped | Raster letters were traced | Rebuild text with the original font |
| SVG is larger than PNG | Source is too complex for vector | Keep raster or recreate simple shapes |
| Corners look rounded | Too much smoothing | Lower smoothing or preserve corners |
If your first SVG looks messy, the answer is not always another tool. Often the answer is better settings. The PNG to SVG Converter Settings guide explains how color count, smoothing, noise removal, background cleanup, and path simplification change the final file.
Should you trace the PNG or recreate the vector?
Trace the PNG when the source is already clean and you need a fast usable SVG. Recreate the vector when the PNG is tiny, blurry, compressed, full of effects, or important enough to become a permanent brand source file.
Use tracing when:
- the PNG is high-resolution
- the artwork has simple shapes
- exact typography is not critical
- the output is for a website, prototype, or short-term asset
- the SVG only needs light cleanup
Recreate when:
- the PNG is under 200px wide
- the file came from a screenshot or email signature
- the logo contains important wordmark typography
- the asset will become the master brand file
- shadows, bevels, gradients, and texture dominate the image
This is a money-saving distinction. A quick trace can solve a website icon in minutes. A bad trace of a permanent logo can waste hours because every future edit inherits the junk paths.
If the PNG is really a rough visual reference, use SVG Genie's AI SVG generator or the Logo Maker to create a cleaner native vector direction instead of preserving every damaged pixel from the original.
How do you make a PNG logo convert better?
Make a PNG logo convert better by simplifying the source before vectorization. Remove the background, export at higher resolution, flatten near-identical colors, delete shadows, and keep the silhouette obvious. The cleaner the source, the fewer accidental paths the converter has to guess around.
For logo PNGs, use this prep rule:
- Export at 2x or 4x if you still have the design file.
- Use transparent background when possible.
- Avoid JPG-to-PNG files unless no better source exists.
- Remove drop shadows and glow effects.
- Keep the palette to the real brand colors.
- Crop extra whitespace before converting.
- Check the logo at favicon size after conversion.
If the source already has transparency, run the transparent PNG to SVG checklist before tracing. It catches white halos, accidental matte colors, and hidden background pixels that are easy to miss in a normal preview.
After conversion, look for three things: a clean viewBox, no accidental background rectangle, and a reasonable path count. If the logo is meant for a product header, it must still read at small sizes. If it only looks good zoomed in at 400%, it is not production-ready yet.
What is the best PNG to vector workflow for web assets?
The best PNG to vector workflow for web assets is to convert to SVG, clean the paths, minify the file, then test it inside the actual UI. Web SVGs need more than visual similarity. They need predictable sizing, accessible markup, and clean styling behavior.
Use this web-ready workflow:
- Convert the PNG to SVG.
- Open the SVG and remove hidden raster images or junk shapes.
- Make sure the file has a proper
viewBox. - Replace fixed colors with
currentColoronly for single-color UI icons. - Keep brand logos on approved fixed colors.
- Add accessible labels only when the SVG communicates meaning.
- Minify the SVG.
- Test inside the real component, not only in a file preview.
For color cleanup after conversion, use How to Change SVG Color Online. Traced PNGs often contain many near-duplicate fills, so palette simplification before recoloring matters.
FAQ
What does PNG to vector mean?
PNG to vector means converting a pixel-based PNG image into scalable vector geometry, usually as SVG for the web or as AI, EPS, or PDF for print and design handoff.
Can every PNG become a good vector file?
No. PNG to vector conversion works best for logos, icons, line art, badges, labels, and flat illustrations. Photos, blurry screenshots, gradients, and textured artwork usually produce large messy vectors.
Is SVG the best vector format for a PNG conversion?
SVG is usually the best output for websites, apps, icons, and editable web assets. Use AI, EPS, or PDF only when a printer or design tool specifically asks for those formats.
Why does my PNG to vector result look messy?
The converter is probably tracing anti-aliased pixels, compression artifacts, shadows, background fragments, or too many similar colors. Clean the PNG first, reduce color count, increase noise removal, and simplify paths.
What is the fastest way to convert a PNG logo to vector?
Use a PNG to SVG converter for the first pass, then inspect the SVG at small and large sizes. If the PNG is low-resolution or full of effects, recreate the vector instead of forcing a bad trace.
Bottom line
PNG to vector conversion works when the source image already has vector-like structure. It fails when you ask it to turn every noisy pixel into clean design judgment.
Start with PNG to SVG for the fastest web-ready output. If the result is messy, use the diagnosis table before retrying. And if the source PNG is too damaged to trace honestly, recreate the vector instead of shipping a fake-clean SVG that will break the next time someone tries to edit it.
Create your own SVG graphics with AI
Describe what you need, get a production-ready vector in seconds. No design skills required.
About This Article
This article was written by SVG Genie Team based on hands-on testing with SVG Genie's tools and years of experience in vector design and web graphics. All recommendations reflect real-world usage and are reviewed by the SVG Genie editorial team for accuracy.
About the Author
SVG Genie Team
SVG Design Expert & Technical Writer at SVG Genie
SVG Genie Team is a vector design specialist and technical writer at SVG Genie with years of hands-on experience in SVG tooling, AI-assisted design workflows, and web graphics optimization. Their work focuses on making professional vector design accessible to everyone.
More articles by SVG Genie Teamarrow_forward