A signature photographed on paper often turns into a disappointing vector: the page becomes a white box, dust becomes dozens of dots, and smooth pen strokes become lumpy paths. The fix is not endless converter retries. It is giving the tracer a cleaner source.
The fast workflow is: write with dark ink, capture the signature at high resolution, remove the paper, increase contrast, convert once, and inspect the paths. For most signatures, that takes a few minutes and produces a scalable mark that is easier to recolor, resize, engrave, or place in a design.
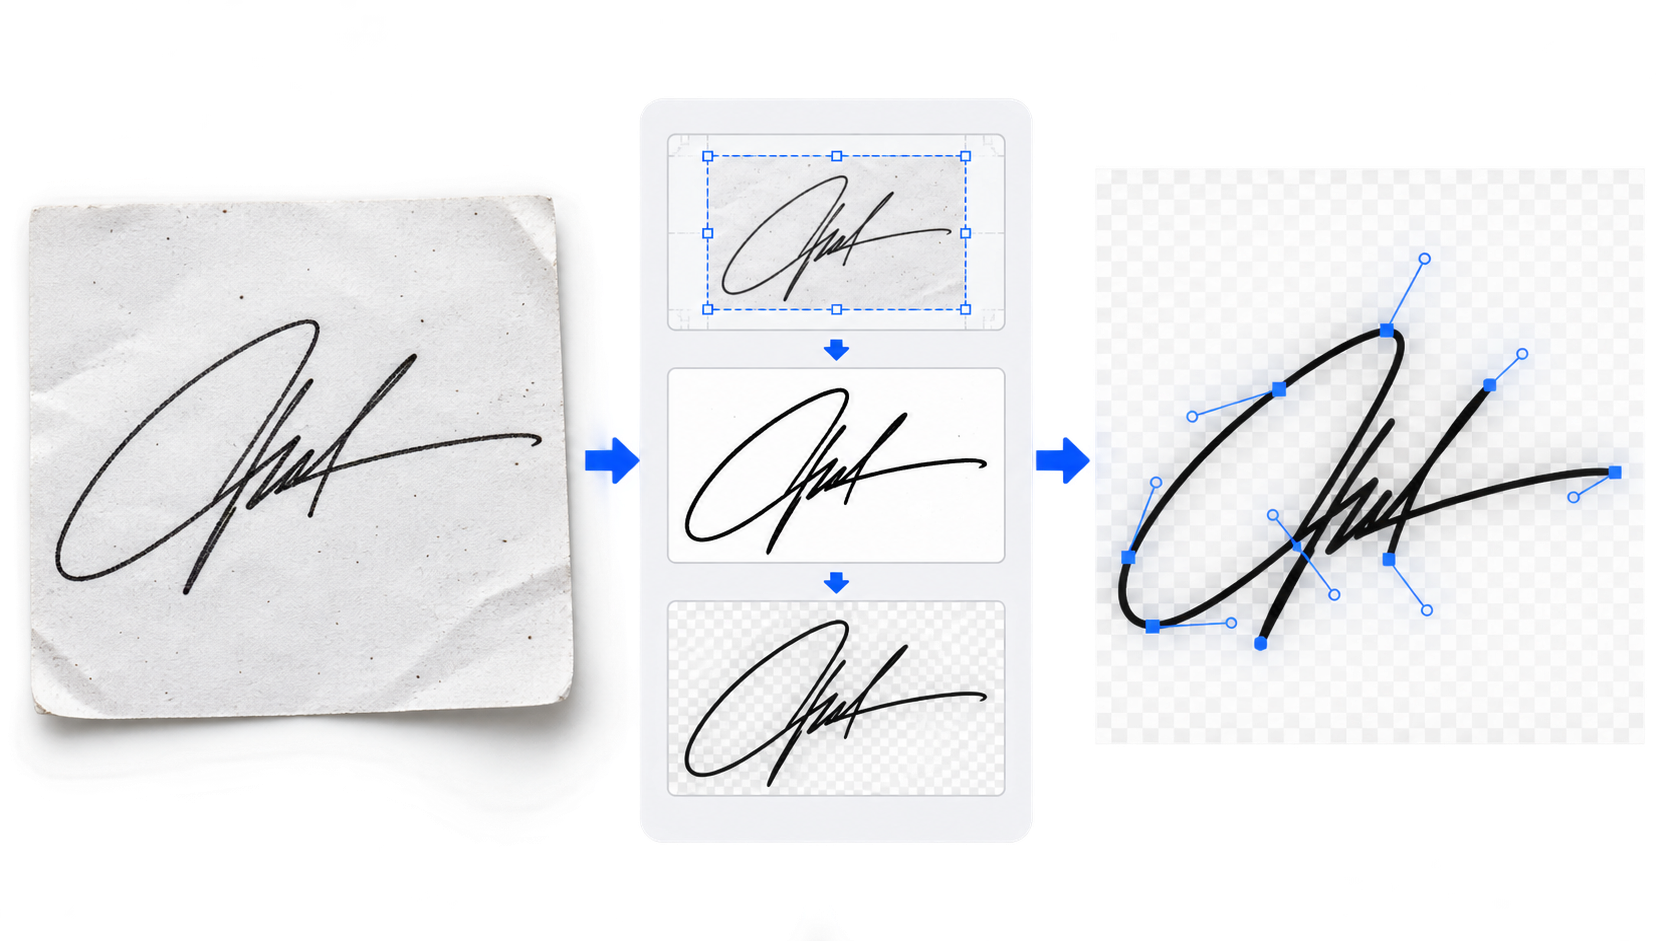
How do you convert a signature to SVG?
Convert a signature to SVG by cleaning the raster image before tracing it. Start with a sharp scan or evenly lit photo, crop close to the ink, remove the paper background, increase contrast, and then use an Image to SVG converter. Finish by checking stroke continuity, loops, speckles, and curve smoothness in an SVG editor.
A vector signature is a handwritten mark represented as scalable paths instead of pixels. The SVG stores the outline as geometry, so the signature can grow for signage or shrink for a design without becoming pixelated. MDN's SVG overview explains the vector format and its web support.
Use this sequence:
- Sign on clean, unlined white paper with a dark pen.
- Scan at 300-600 dpi, or photograph the page in soft, even light.
- Crop close to the signature without clipping flourishes.
- Convert the image to grayscale and remove the paper background.
- Increase contrast until the ink is solid and the background is clean.
- Upload the result to Image to SVG.
- Inspect and clean the paths in SVG Editor.
- Save the SVG master and export a transparent PNG when another app requires it.
What is the best source image for a vector signature?
The best source is a large, sharp scan made with dark ink on plain white paper. A 300-600 dpi scan gives the tracer enough edge information to preserve natural curves without inventing pixel stair-steps. A phone photo can work when the page is flat, the camera is directly above it, and the lighting creates no shadows.
Choose the source with this decision table:
| Source | Expected result | Best action |
|---|---|---|
| 300-600 dpi scan, dark ink | Excellent | Crop, clean, and convert |
| Sharp phone photo in even light | Good | Correct perspective and remove shadows |
| Transparent PNG signature | Good | Check edge halos, then convert |
| Screenshot from a PDF | Fair | Find the original or capture at a larger size |
| Small JPG from email or chat | Poor | Request a better source or redraw |
| Pencil on textured paper | Unpredictable | Resign in ink or simplify deliberately |
A larger file is useful only when it contains real detail. Upscaling a tiny compressed signature makes more pixels, not more accurate handwriting. If the only source is small and blurry, a careful manual redraw may be faster than repairing hundreds of bad anchor points.
How should you photograph or scan a handwritten signature?
Capture the signature so the ink and paper are easy to separate. Keep the page flat, the camera parallel to it, and the light soft and even. Avoid direct flash, warm room lighting, folded paper, ruled lines, and shadows from your hand or phone because each can become unwanted vector geometry.
Before capture, use this checklist:
- Use unlined, untextured white paper.
- Choose black or dark blue ink with consistent flow.
- Leave space around long strokes and flourishes.
- Make three or four signatures and choose the most natural one.
- Scan at 300-600 dpi, or fill the phone frame without digital zoom.
- Keep the lens directly above the page to avoid skew.
- Save as PNG when possible to avoid JPG compression around the ink.
For a broader cleanup process, follow Prepare an Image for SVG Conversion. If the signature arrived as a screen capture, the screenshot-to-SVG workflow covers cropping, resolution, and UI-background problems.
How do you remove the white background from a signature?
Remove the background before tracing by turning the paper transparent or pushing it to pure white while keeping the ink dark. The goal is a clean separation between mark and page. If gray paper texture remains, a converter may trace it as speckles; if the background is retained, it may become a solid rectangle.
For a simple black signature:
- Convert the source to grayscale.
- Adjust levels or contrast until the ink is dark and the paper is nearly white.
- Remove dust, ruled lines, shadows, and isolated marks.
- Make white transparent if your image editor supports it.
- Zoom in and inspect thin joins before exporting.
Do not erase so aggressively that natural connections disappear. The cross in a t, the dot above an i, and narrow loops can be legitimate separate shapes. Preserve intentional details while removing paper noise. The black-and-white image to SVG guide has a focused threshold checklist for this exact kind of artwork.
Which tracing settings work best for a signature?
Use a one-color trace, moderate smoothing, and conservative noise removal. A signature needs enough smoothing to hide pixel stair-steps but not so much that loops close, sharp turns melt, or the personality of the handwriting disappears. Favor a recognizable mark over the fewest possible anchor points.
Diagnose the first conversion instead of changing every setting:
| Output problem | Likely cause | Fix |
|---|---|---|
| Tiny dots around the signature | Paper texture, dust, or JPG noise | Clean the raster and raise noise filtering |
| Thin strokes disappear | Contrast threshold is too aggressive | Restore stroke weight or reduce the threshold |
| Loops fill in | Interior gaps are too small | Use a larger source and preserve counters |
| Curves look angular | Low resolution or too little smoothing | Use a sharper source and moderate smoothing |
| Handwriting looks melted | Too much smoothing | Reduce smoothing and retain intentional corners |
| SVG has hundreds of nodes | Every edge pixel was traced | Denoise first, then simplify carefully |
If the result still has bad curves or excessive paths, use the bad image-to-SVG conversion fixes before optimizing the file.
How do you clean the SVG without changing the handwriting?
Clean the SVG by deleting obvious background and noise paths first, then repairing only visibly damaged strokes. Avoid aggressive path simplification across the entire signature. It can move distinctive corners, close narrow gaps, and turn a personal mark into generic cursive.
Open the file in SVG Editor and inspect it at three sizes:
- At small size, confirm the signature remains recognizable.
- At normal size, look for broken joins, filled loops, and stray dots.
- At high zoom, remove redundant nodes only where they create visible bumps.
Check the SVG on both light and dark backgrounds. A white rectangle or pale edge halo is easy to miss on a white editor canvas. Keep a little intentional whitespace in the viewBox, but remove huge margins that make the signature appear tiny when embedded.
When should you use SVG, PNG, or a real e-signature tool?
Use SVG as a reusable design asset, PNG for software that accepts only raster images, and a proper e-signature service when identity, consent, audit history, or legal evidence matters. A traced signature is artwork; placing it in a document does not by itself provide signer authentication or tamper evidence.
| Job | Best format or method | Why |
|---|---|---|
| Print design, engraving, vinyl, branding | SVG | Scales cleanly and remains editable |
| Email signature graphic | Transparent PNG | Broader client compatibility |
| Slide deck or office document | PNG first; SVG if supported | Predictable rendering across apps |
| Website decorative signature | SVG | Sharp at responsive sizes |
| Contract approval or regulated workflow | E-signature platform | Adds identity and audit controls |
Treat a signature file as sensitive. Store it somewhere private, do not place it in a public asset folder unless it is intentionally a public brand mark, and do not assume SVG makes it secure. SVG is XML-based content; for user-uploaded files, follow the SVG upload security checklist and sanitize files before rendering them on a site.
FAQ
How do I convert my signature to SVG?
Sign on plain white paper with dark ink, scan or photograph it evenly, crop the image, remove the paper background, increase contrast, and convert the cleaned image with an image-to-SVG tool. Inspect the result for broken strokes, filled loops, speckles, and excessive anchor points before using it.
Can an SVG signature have a transparent background?
Yes. Remove the paper background before conversion or delete the traced background shape afterward. A transparent SVG should contain the signature paths without a white rectangle, allowing it to sit cleanly on different backgrounds.
Why does my vector signature look jagged?
A vector signature usually looks jagged because the source is too small, compressed, unevenly lit, or over-sharpened. Start with a larger scan, clean the edge noise, and use moderate smoothing that preserves handwriting without tracing every pixel.
Should I use SVG or PNG for a digital signature?
Use SVG when you need a scalable signature for design, print, engraving, or cutting. Use a transparent PNG when the destination does not accept SVG, especially email clients and document tools. Keep both exports, and never treat a signature image as secure proof of identity.
Turn the cleaned signature into a vector
Start with the cleanest, largest capture you have, then run it through Image to SVG. If the output has paper speckles or broken strokes, fix the source once instead of cycling through random settings. Finish the usable result in SVG Editor, keep the SVG as your master, and export a transparent PNG for apps that need pixels.
Create your own SVG graphics with AI
Describe what you need, get a production-ready vector in seconds. No design skills required.
About This Article
This article was written by SVG Genie Team based on hands-on testing with SVG Genie’s tools and years of experience in vector design and web graphics. All recommendations reflect real-world usage and are reviewed by the SVG Genie editorial team for accuracy.
About the Author
SVG Genie Team
SVG Design Expert & Technical Writer at SVG Genie
SVG Genie Team is a vector design specialist and technical writer at SVG Genie with years of hands-on experience in SVG tooling, AI-assisted design workflows, and web graphics optimization. Their work focuses on making professional vector design accessible to everyone.
More articles by SVG Genie Teamarrow_forward