A tattoo design can look crisp on paper and turn into a mess after automatic tracing: thin details disappear, nearby lines fuse together, and paper grain becomes hundreds of useless vector points. The fastest fix is to clean the source before conversion, then judge the SVG at the size the stencil or artwork will actually be used.
The quick rule is: use a clean scan for linework, simplify shading before tracing, and never trace a curved photo of skin when the original drawing is available. A prepared design can become a usable SVG in minutes; a noisy photo usually creates more repair work than it saves.
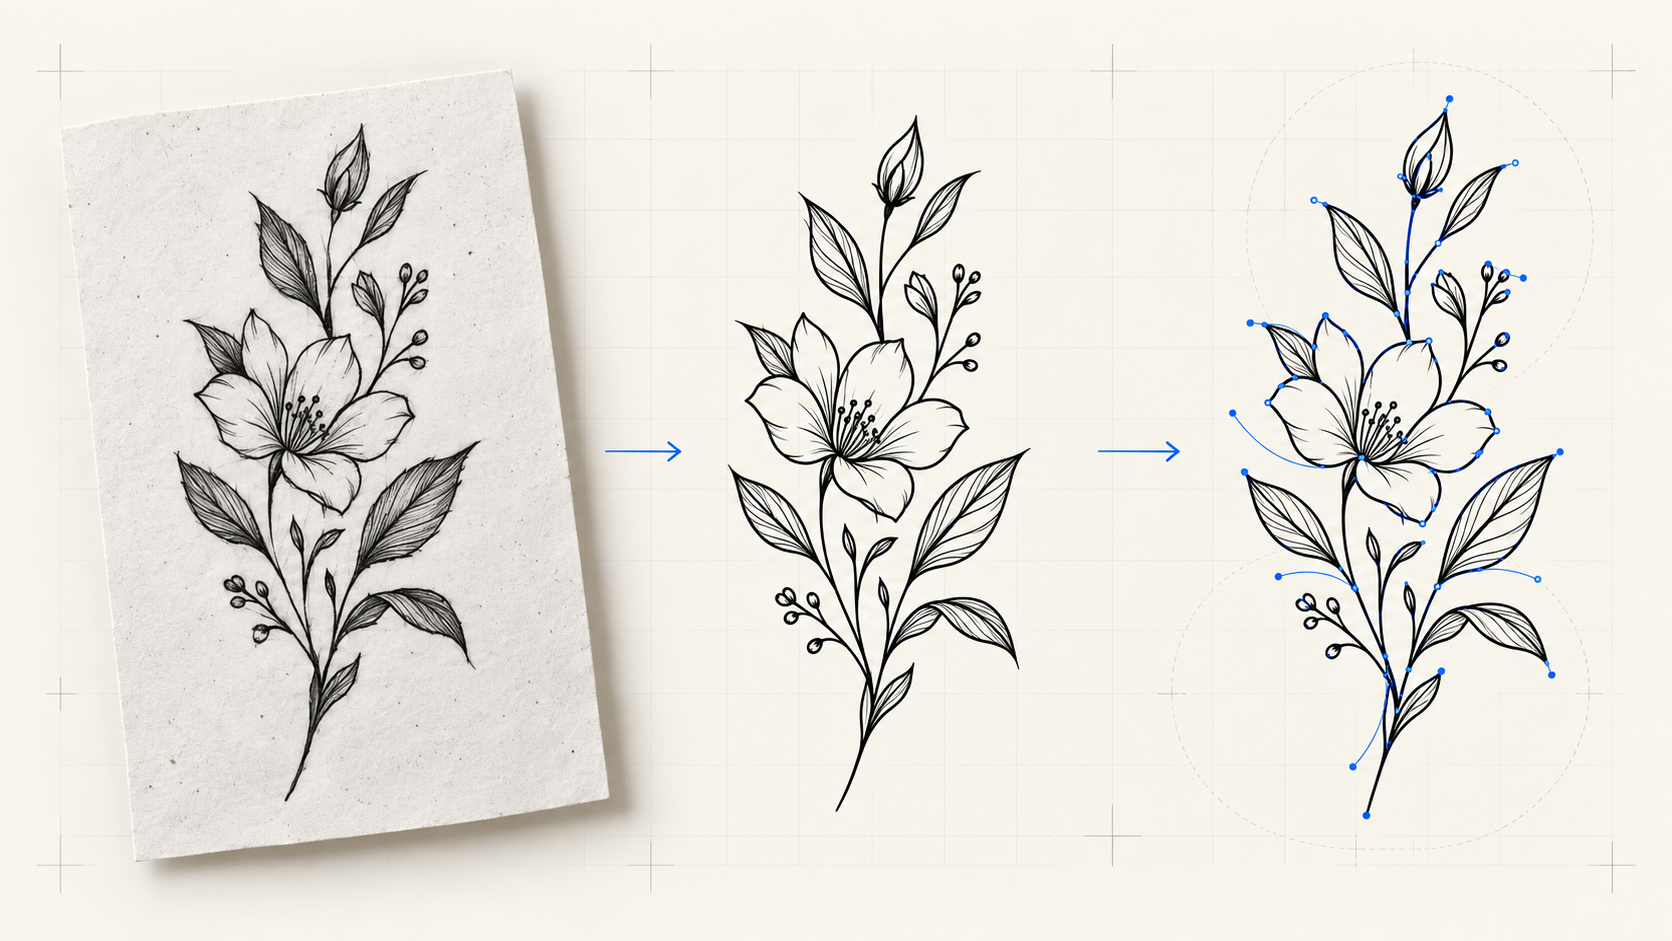
How do you convert a tattoo design to SVG?
Convert a tattoo design to SVG by scanning or photographing the artwork straight-on, cleaning the background, increasing line contrast, and running the prepared image through an Image to SVG converter. Open the result in an SVG editor and check the silhouette, negative spaces, line joins, and path count before using it as a stencil or scalable design asset.
Tattoo vectorization is the process of translating pixel-based tattoo artwork into scalable geometric paths. The SVG can be resized without pixelation, but conversion does not automatically make the design tattoo-ready. An artist still needs to judge line spacing, placement, and how the design will age on skin.
Use this workflow:
- Start with the original drawing or stencil whenever possible.
- Scan it at 300-600 dpi, or take a large, evenly lit photo from directly above.
- Crop tightly and correct perspective.
- Remove paper shadows, texture, ruled lines, and unrelated marks.
- Convert the image to high-contrast black-and-white line art.
- Upload the cleaned file to Image to SVG.
- Inspect and repair the paths in SVG Editor.
- Keep the SVG master and export the format your tattoo artist requests.
What source image gives the cleanest tattoo vector?
The cleanest source is a high-resolution scan of dark, finished linework on plain white paper. It separates intentional marks from the background and avoids perspective distortion. A phone photo can work if the page is flat and evenly lit. A healed-tattoo photo is a last resort because skin introduces texture, glare, curvature, and line changes.
| Source | Likely trace quality | Best next step |
|---|---|---|
| Original digital artwork | Excellent | Export SVG directly if vectors exist |
| 300-600 dpi scan of clean linework | Excellent | Adjust contrast, then convert |
| Straight, evenly lit phone photo | Good | Correct perspective and clean shadows |
| Screenshot from social media | Fair to poor | Find the original or obtain a larger file |
| Photo of a fresh or healed tattoo | Unpredictable | Isolate ink, correct distortion, and redraw damaged details |
| Shaded pencil concept | Unpredictable | Separate the outline from tonal shading first |
A bigger image only helps when it contains real detail. Upscaling a compressed screenshot enlarges blur and artifacts; it does not restore the artist's original curves. If the only reference is tiny, manually rebuilding the important contours is often cleaner than tracing every compression block.
For general capture and cleanup advice, use Prepare an Image for SVG Conversion. If the artwork is an early paper concept rather than finished flash, the hand-drawn sketch vectorization guide explains when to trace and when to redraw.
How should you clean tattoo linework before tracing?
Clean tattoo linework by creating an obvious separation between ink and background while preserving every intentional gap. Remove dust and shadows, convert to grayscale, and adjust levels gradually. Avoid aggressive threshold settings that thicken fine lines, close small openings, or merge nearby elements into one black shape.
Before converting, check that:
- The design is upright and not skewed by camera angle.
- The background is solid white or transparent.
- Fine lines remain continuous at 100% zoom.
- Small negative spaces are still open.
- Shading intended for the tattoo is separated from accidental paper texture.
- No hand, ruler, caption, watermark, or page edge remains in the crop.
- The art is used with the artist's permission.
For pure black linework, the black-and-white image to SVG workflow gives a focused thresholding process. Preserve deliberate roughness if it is part of the style; “clean” should mean removing capture noise, not sterilizing the drawing.
Which vectorization approach fits each tattoo style?
The best approach depends on what carries the design: outlines, solid shapes, tonal shading, or texture. One automatic setting will not handle all four equally well. Trace bold linework directly, simplify delicate work cautiously, and rebuild photorealistic or heavily shaded designs with an artist rather than expecting a one-click SVG to understand tone.
| Tattoo artwork style | Recommended approach | Main failure to watch |
|---|---|---|
| Bold traditional linework | One-color trace | Rounded corners or merged gaps |
| Fine-line botanical or script | High-resolution trace with gentle smoothing | Missing hairlines and altered joins |
| Geometric or ornamental | Trace, then align and rebuild repeated shapes | Slight asymmetry and uneven spacing |
| Blackwork silhouette | Filled-shape trace | Small counters closing up |
| Dotwork | Selective/manual reconstruction | Thousands of noisy paths |
| Realism or smooth shading | Artist-led redraw or layered interpretation | Posterized bands and unusable complexity |
If the output looks wrong, do not keep changing random controls. Diagnose the visible defect and fix the source or the specific path. The guide to fixing bad image-to-SVG conversions covers jagged edges, bloated files, missing detail, and unwanted backgrounds.
Should tattoo SVG linework use strokes or filled paths?
Use editable strokes while refining line weight, but use expanded filled paths when exact appearance must survive movement between apps. Strokes are easier to adjust; outlined fills are more predictable when software interprets caps, joins, scaling, or stroke alignment differently. Ask the receiving artist or print workflow which form it expects.
Choose with this rule:
- Use strokes when line thickness still needs creative adjustment.
- Use filled outlines when the visual weight is approved and portability matters most.
- Keep both versions when the SVG will move between design, stencil, cutting, or print tools.
At normal viewing size, check line caps, corners, overlaps, and tapered ends. Then zoom out to the intended tattoo size. A tiny gap that looks generous on a monitor may disappear when the design is reduced. Vector precision cannot replace an experienced tattoo artist's judgment about feasible size, placement, healing, or longevity.
How do you check whether the SVG is actually usable?
A usable SVG matches the approved artwork, opens correctly, scales without visual surprises, and does not contain needless background or noise paths. Review it on light and dark canvases, at actual output size, and in the destination software. The final approval should come from the tattoo artist who will adapt the design for the body and stencil process.
Run this five-minute quality check:
- Compare the SVG beside the source at the same apparent size.
- Confirm all intentional gaps, holes, and counters remain open.
- Look for doubled edges caused by tracing both sides of a line.
- Delete stray dots and hidden background rectangles.
- Check whether thin sections vanish when viewed at intended size.
- Confirm curves do not wobble because of excessive anchor points.
- Open the file in a second app or browser to catch compatibility problems.
- Save an untouched master before expanding strokes or simplifying paths.
SVG is an XML-based vector format standardized for the web; MDN's SVG reference is a reliable overview of how the format works. If the file will be uploaded to a website or accepted from another person, follow the SVG upload security checklist before rendering it.
Can you vectorize a tattoo from a photo on skin?
Yes, but treat the result as a reconstruction, not a faithful one-click conversion. Photograph the tattoo square-on in diffuse light, correct body curvature and perspective, isolate the ink from skin tone, and manually repair lines hidden by glare, hair, fading, or anatomy. Obtain permission from the artist or rights holder before reproducing someone else's design.
A skin photo is useful when documenting or rebuilding original work and no flat artwork survives. It is a poor source for copying a tattoo seen online. Beyond permission, the technical result will inherit distortion from the photograph and the body surface. A flat redraw based on the artist's original file is almost always cleaner.
FAQ
How do I convert a tattoo design to SVG?
Capture the artwork straight-on, remove paper texture and shadows, raise the contrast, and convert the cleaned image with an image-to-SVG tool. Then inspect the SVG for closed gaps, doubled outlines, stray paths, and curves that no longer match the original design.
What image is best for converting tattoo art to vector?
A large, sharp scan or evenly lit photo of dark line art on plain white paper works best. Clean black outlines with visible negative space trace more reliably than a small social-media screenshot, a photo on skin, or a shaded pencil drawing.
Can I convert a photo of a tattoo on skin to SVG?
You can, but skin texture, body curvature, glare, hair, and perspective can distort the trace. Whenever possible, request the original drawing or stencil. If the photo is the only source, correct perspective and isolate the ink before vectorizing.
Should tattoo linework use fills or strokes in SVG?
Use filled closed shapes when the file must preserve exact visual weight across apps, and use editable strokes when an artist needs to adjust line thickness. For production, confirm the receiving software handles strokes consistently or expand them to outlines.
Turn the cleaned tattoo artwork into a scalable SVG
Use the original flat artwork, clean only the noise that does not belong, and convert it once with Image to SVG. Then review the result in SVG Editor at the intended size and send both the SVG and the source reference to your tattoo artist. That gives them a clean starting point without pretending software can make the final skin-specific decisions.
Create your own SVG graphics with AI
Describe what you need, get a production-ready vector in seconds. No design skills required.
About This Article
This article was written by SVG Genie Team based on hands-on testing with SVG Genie’s tools and years of experience in vector design and web graphics. All recommendations reflect real-world usage and are reviewed by the SVG Genie editorial team for accuracy.
About the Author
SVG Genie Team
SVG Design Expert & Technical Writer at SVG Genie
SVG Genie Team is a vector design specialist and technical writer at SVG Genie with years of hands-on experience in SVG tooling, AI-assisted design workflows, and web graphics optimization. Their work focuses on making professional vector design accessible to everyone.
More articles by SVG Genie Teamarrow_forward