A laser cutter does not care that your artwork looks right in a browser. It follows geometry. One hidden duplicate can cut an edge twice, an open path can break an engrave, and live text can disappear when the machine computer lacks the font.
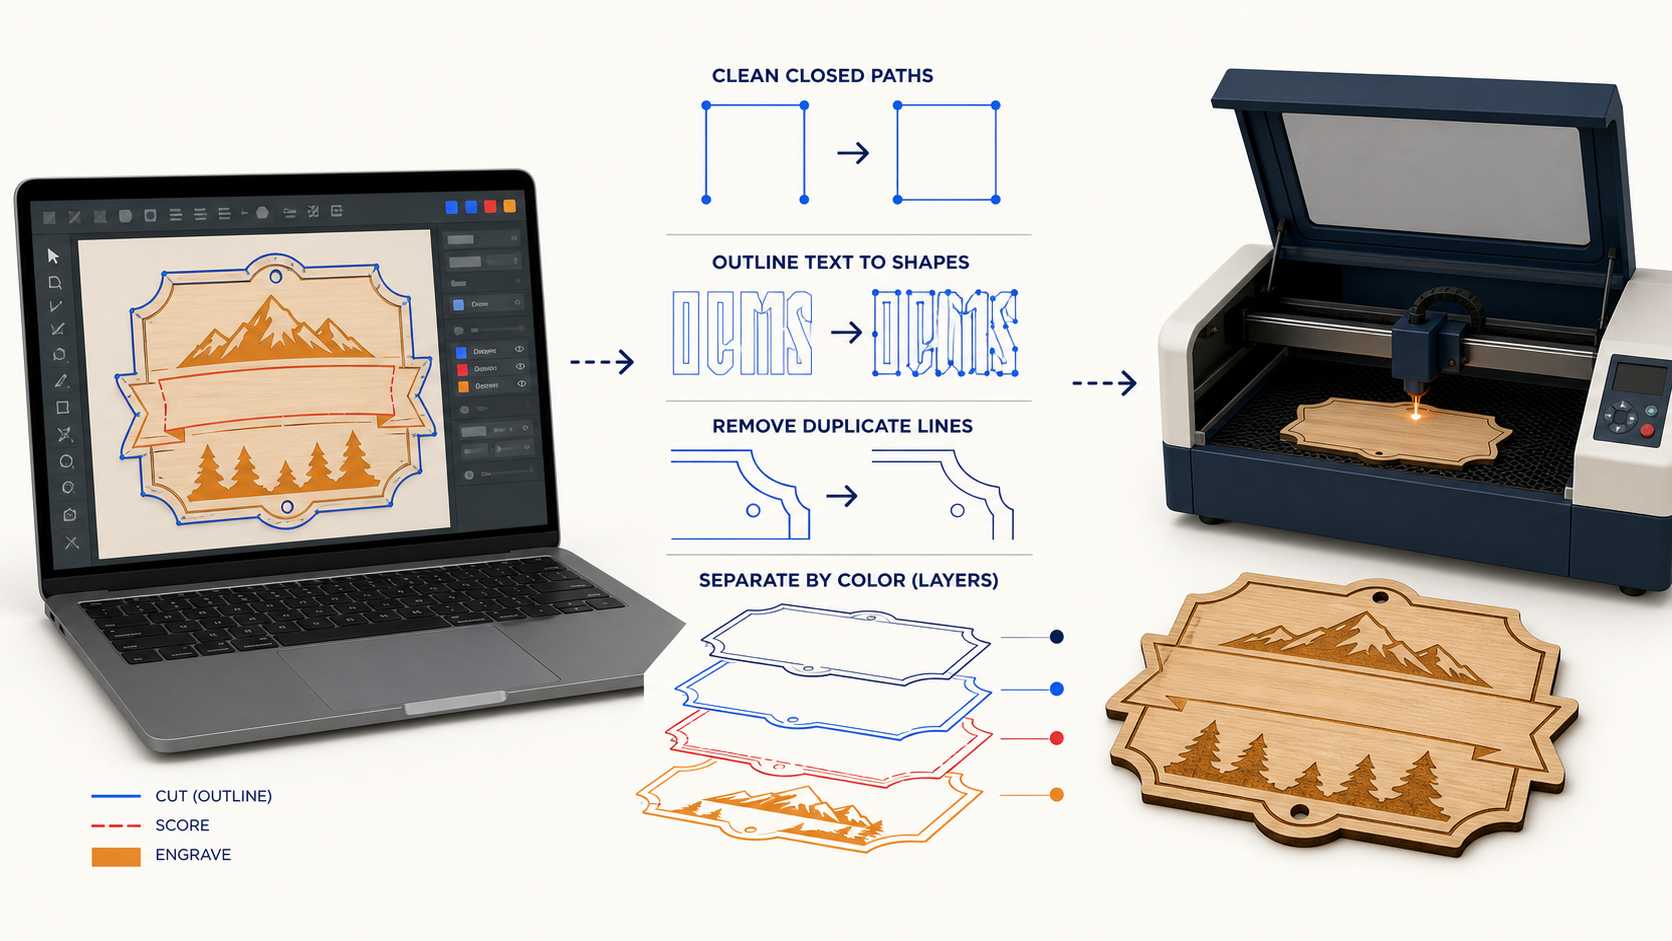
The fast rule: separate cut, score, and engrave artwork by color; outline final text; close filled shapes; remove duplicate lines; confirm real-world size; then test the imported job on scrap. Do those checks before optimizing or adding machine settings.
If you already have vector artwork, inspect a copy in SVG Editor. If your source is a photo, scan, or flattened graphic, create vector geometry first with Image to SVG.
What is a laser-cut SVG file?
A laser-cut SVG file is a Scalable Vector Graphics document whose paths are organized for cutting, scoring, or engraving. Cut and score operations normally follow vector lines, while engraves use filled vector regions or raster images. The SVG stores the artwork; your laser software still controls material, power, speed, and passes.
A laser-cut SVG is a geometry plan, not a complete machine recipe. SVG can preserve paths, fills, colors, groups, and physical dimensions, but it cannot safely choose settings for an unknown machine and material.
Glowforge's official guidance explains the basic distinction: strokes import as cuts and fills as engraves, with strokes also assignable to scoring. LightBurn likewise requires a closed loop when a shape will be filled. Those rules explain most failed imports before you touch machine settings.
How do you prepare an SVG for laser cutting?
Prepare an SVG by making every machine operation visually unambiguous, converting fragile objects into predictable paths, cleaning the geometry, and checking scale. Import the result into the actual laser software and inspect its operation preview before placing material in the machine.
Use this 10-minute preflight:
- Duplicate the original and keep the master editable.
- Open the copy in SVG Editor.
- Delete hidden, locked, stray, and duplicate objects.
- Give cut, score, and engrave elements different solid colors.
- Use strokes for intended vector lines and closed fills for engraved regions.
- Convert final text to paths after proofreading it.
- Close broken shapes and join endpoints that should meet.
- Simplify only obviously excessive nodes while preserving corners.
- Confirm the document dimensions and
viewBoxmatch the intended size. - Import the SVG, assign operations, and test on scrap.
Do not copy power or speed values from a random tutorial. Settings depend on the laser, lens, material, thickness, focus, ventilation, and desired result. Use the manufacturer's material guidance and your own test grid.
Should laser-cut SVG files use strokes or fills?
Use vector strokes for lines the machine should cut or score, and use closed filled shapes for areas it should engrave. Keep each operation a clearly different color so the laser software can map colors to process settings without guesswork.
| Artwork in the SVG | Typical operation | Preflight check |
|---|---|---|
| Thin vector stroke | Cut or score | Confirm it appears once and follows the intended contour |
| Closed filled shape | Vector engrave or fill | Confirm the path is closed and holes are preserved |
| Embedded PNG or JPG | Raster engrave | Confirm resolution at the final physical size |
| Outlined text | Cut, score, or engrave | Check holes inside A, B, O, and R |
| Live text | Unreliable handoff | Outline the final copy and retain an editable master |
| Gradient, filter, or shadow | Software-dependent | Flatten intentionally or replace with simple geometry |
Glowforge's stroke simplification guide notes that high node counts can slow processing or cause preparation failures. Simplification helps, but it should follow visual cleanup: too much rounds corners and changes fitted parts.
How do you separate cut, score, and engrave operations?
Separate operations with distinct colors and, when possible, separate groups or layers. A simple convention is blue for cut, red for score, and black or orange fill for engrave. Colors are organizational labels; they do not determine power until you assign settings after import.
- If the laser must travel along a contour and separate material, mark a cut path.
- If it must draw a shallow line without separating material, mark a score path.
- If it must shade an area, use a filled vector region or raster engrave.
Glowforge's Inkscape gift-tag tutorial demonstrates that each color can become a separate process step. Regardless of software, inspect the imported job rather than assuming layer names or colors mapped correctly.
Why must filled shapes be closed?
A fill needs an inside and an outside. If the path has a tiny gap, the editor may display something plausible while the laser software treats it as an open line, refuses to fill it, or closes it unexpectedly. Join endpoints intentionally instead of hiding gaps with thicker strokes.
LightBurn's menu documentation states that a shape must be a closed loop to fill it and describes tools for closing nearby endpoints. Before exporting, zoom into corners and junctions, especially on traced artwork, script lettering, maps, and CAD-derived files.
Look for endpoints that almost touch, overlapping corner segments, shared boundary lines, self-intersections, missing compound-path holes, and tiny fragments left by tracing. For noisy artwork, use the SVG cleanup checklist before simplifying the whole design.
Why does a laser cut the same SVG line twice?
A laser usually repeats a line because two identical paths occupy the same position, adjacent pieces share an edge, or a copied object was never removed. The duplicate can be invisible in normal preview but creates a second pass that may char material or release a part early.
- Switch the editor to outline or wireframe view.
- Select the suspicious line and move it temporarily.
- If another line remains underneath, delete the duplicate.
- Check adjacent shapes for shared boundaries.
- Step through the laser software's path preview.
- Restore the intended geometry and save a new production copy.
Making duplicates the same color does not solve the problem. It gives them the same operation but leaves the second pass intact.
Should you convert text to paths before laser cutting?
Convert text to paths after the wording, font, spacing, and size are final. Outlining prevents font substitution on another computer, but it also removes normal text editing. Keep one live-text master and export a separate outlined production SVG.
Glowforge's text troubleshooting guide recommends converting text into shapes when its app cannot process the font. After outlining, check that letter counters remain intact and thin bridges are wide enough for the material.
If text is already messy or fake vector lettering, use the edit SVG text guide before creating the production outline.
How do you set the correct SVG size for laser cutting?
Set the document in a physical unit such as millimetres or inches, preserve a valid viewBox, and compare one known dimension after import. Never assume a browser-sized SVG will arrive at the intended physical scale in every laser program.
If a sign must be 200 mm wide, make the artwork 200 mm wide and confirm it remains 200 mm after import. Check the outside contour, not just the canvas. The SVG viewBox guide explains how internal coordinates and displayed dimensions interact.
For fitted parts, add a labelled test piece rather than trusting nominal material thickness. Kerf and fit depend on the machine and material, so validate tabs, slots, and inlays with a small physical test.
What SVG features commonly break in laser software?
Laser software often handles basic paths well but may interpret masks, clipping paths, filters, patterns, gradients, embedded fonts, and external references differently. Replace decorative web effects with explicit geometry or a deliberate raster engrave before production.
| Symptom after import | Likely cause | Fast fix |
|---|---|---|
| Text is missing or changed | Font unavailable | Outline final text |
| Engrave area is empty | Open path or unsupported fill | Close path and use a solid fill |
| Design imports at wrong size | Unit or viewBox mismatch | Set physical dimensions and verify one measurement |
| Edge cuts twice | Duplicate or shared line | Remove overlapping geometry |
| File processes slowly | Excessive nodes or effects | Simplify carefully and flatten intended engraves |
| Photo will not cut as an outline | Embedded raster image | Trace or redraw a vector contour |
Rasterizing can help with complex engraving, but it changes the job. Glowforge's rasterization guide explains that bitmap artwork can be engraved but not used as a vector cut or score path.
What should you check before starting the laser?
Check the imported operations, size, path order, material setup, focus, ventilation, and test result. The SVG preflight prevents geometry mistakes; the machine preflight prevents unsafe or expensive ones. Stay with the machine and follow its manufacturer's operating guidance.
- Cut, score, and engrave elements are assigned correctly.
- No path is duplicated or unexpectedly hidden.
- All intended filled shapes are closed.
- Final text is outlined and proofread.
- Physical dimensions match the job.
- Small islands and internal holes are preserved.
- The material is approved for the machine and its coating is known.
- Focus, ventilation, and work holding follow manufacturer guidance.
- A scrap test confirms the operation before the full job.
- The machine will remain attended while running.
SVG cleanup cannot make an unknown material safe. Do not laser material unless the manufacturer identifies it as compatible with your equipment and ventilation setup.
FAQ
How do I prepare an SVG for laser cutting?
Prepare an SVG by separating cut, score, and engrave operations, outlining final text, closing filled shapes, removing duplicate lines, simplifying excessive nodes, confirming document size, and running a scrap test.
Should laser-cut SVG files use strokes or fills?
Use simple vector strokes for cut and score paths, and closed filled shapes for engraved areas. Separate operations by clearly different colors and verify their assignments after import.
Why does my laser cut the same SVG line twice?
The line is usually duplicated, stacked beneath another object, or shared by adjacent shapes. Inspect the SVG in outline mode, delete overlapping geometry, and preview the machine path before cutting.
Do I need to convert text to paths for laser cutting?
Convert final text to paths when the receiving computer may not have the font. Keep a separate editable master because outlined text can no longer be edited normally.
Can a PNG inside an SVG be laser cut?
A PNG inside SVG remains raster artwork. It can usually be engraved, but it needs a clean vector outline before it can become a cut path.
Clean the SVG before you waste material
Open a copy in SVG Editor, separate the operations, repair the paths, and confirm the size. If the design began as a PNG or scan, use Image to SVG to create actual vector geometry first. Then import the production copy and run the smallest useful scrap test before committing good material.
Create your own SVG graphics with AI
Describe what you need, get a production-ready vector in seconds. No design skills required.
About This Article
This article was written by SVG Genie Team based on hands-on testing with SVG Genie’s tools and years of experience in vector design and web graphics. All recommendations reflect real-world usage and are reviewed by the SVG Genie editorial team for accuracy.
About the Author
SVG Genie Team
SVG Design Expert & Technical Writer at SVG Genie
SVG Genie Team is a vector design specialist and technical writer at SVG Genie with years of hands-on experience in SVG tooling, AI-assisted design workflows, and web graphics optimization. Their work focuses on making professional vector design accessible to everyone.
More articles by SVG Genie Teamarrow_forward