You have an SVG that is 90% right and 10% infuriating. The logo scales cleanly, but one curve has a kink. The icon looks fine at 512px but turns jagged at 24px. A PNG-to-SVG conversion worked, but it left tiny fragments around the edge. Figma exported a valid SVG, but the paths are harder to reuse than they should be.
The fastest rule is:
Use an SVG path editor for visible shape problems, not for bulk compression. Fix the jagged curve, remove the unwanted fragment, preserve the viewBox, then optimize the SVG only after the design looks right.
That order matters. An optimizer can reduce file size, but it cannot know whether a bump in a traced logo is a design detail or a conversion artifact. Path editing is where you make that call.
What is an SVG path editor?
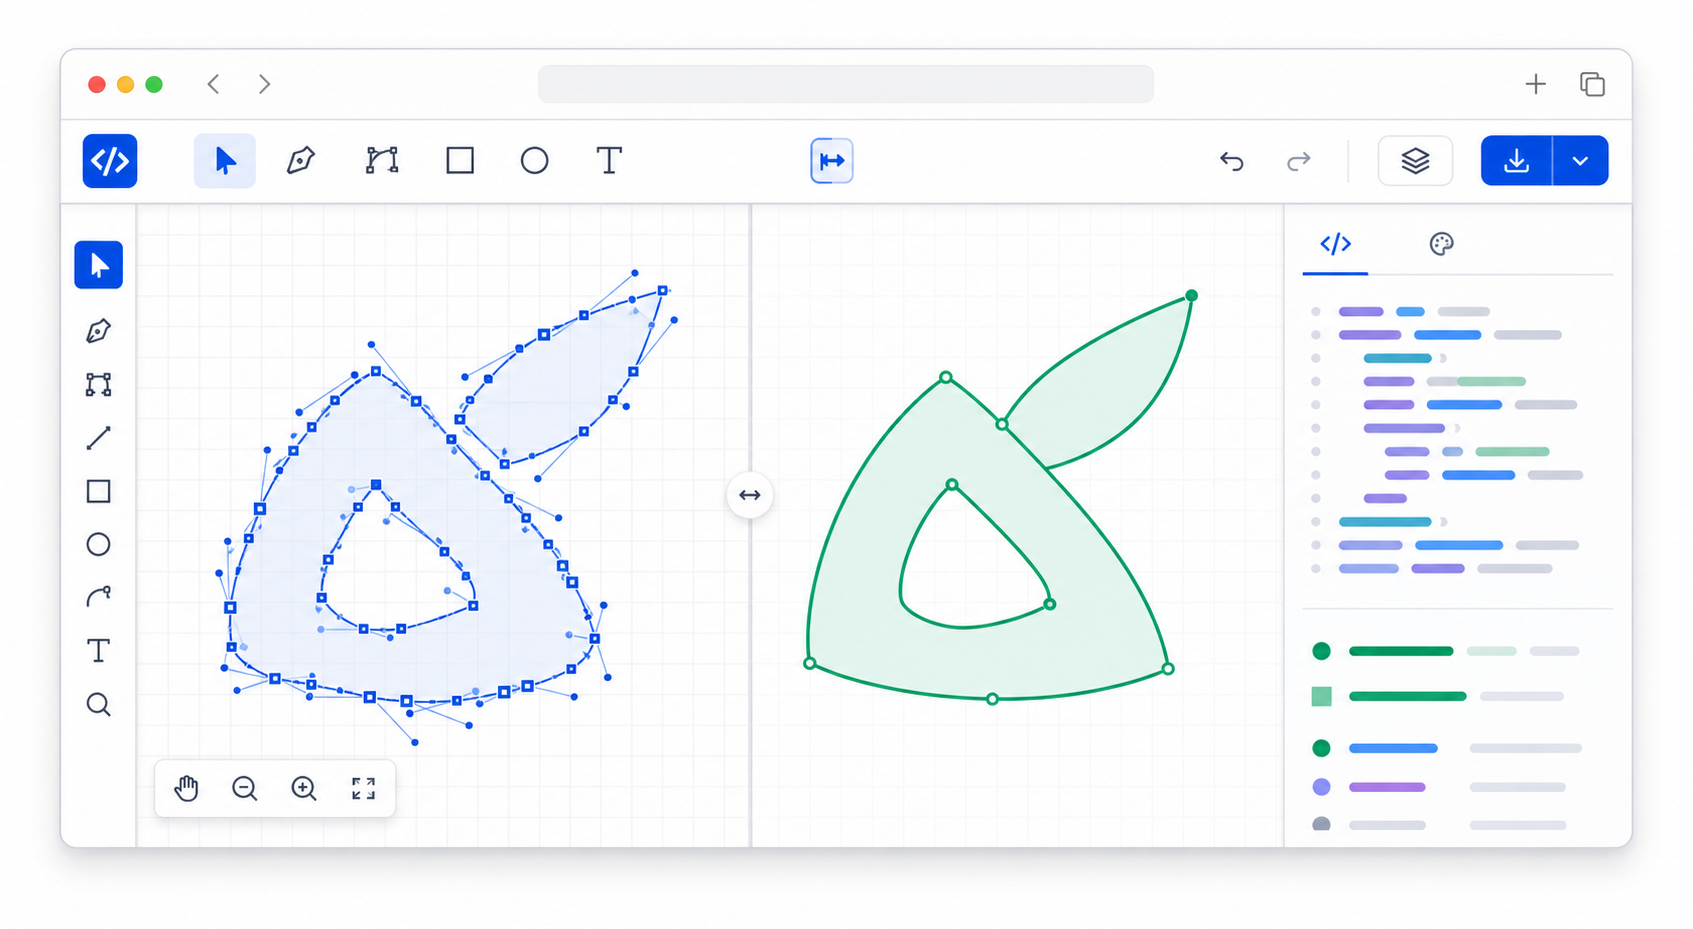
An SVG path editor is a tool for inspecting and changing the vector path data inside an SVG file. It lets you select shapes, move anchor points, smooth curves, remove extra nodes, adjust fills and strokes, and export the corrected file without redrawing the asset from scratch.
An SVG path is the vector instruction that draws a shape, usually stored in the d attribute of a <path> element. That path can include move commands, straight lines, cubic Bezier curves, quadratic curves, arcs, and close-path commands. The browser reads those instructions and renders the shape at any size.
Useful technical references:
For most practical work, you do not need to memorize every path command. You need to know what kind of problem you are fixing: shape, color, structure, or file size.
| Problem | Best First Tool | Why |
|---|---|---|
| Jagged logo edge | SVG path editor | The visible shape needs manual judgment |
| Wrong fill or stroke | SVG editor or color changer | The geometry is fine; color attributes need editing |
| Huge file size | SVG optimizer | Markup and numeric precision are the main issue |
| Missing responsive scaling | Code editor or SVG editor | The viewBox, width, and height need inspection |
| Traced PNG has fragments | Path editor, then optimizer | Remove visual noise before compression |
| Figma export has metadata | Optimizer, then visual check | The design is already clean; code is noisy |
If you want a fast browser workflow, open the file in SVG Genie's SVG editor, fix the visible path issues, then run the final file through the SVG optimizer if size still matters.
If you are not sure whether the issue is a path problem, a color problem, or a code problem, use the SVG file editor workflow first. It helps you choose the smallest safe edit before touching the path data.
How do I edit SVG paths online without breaking the file?
The safest way to edit SVG paths online is to work on a copy, change only the visible shape that needs correction, preserve structural attributes like viewBox, and test the output in the real page. Small, targeted edits are safer than selecting everything and simplifying blindly.
Use this 10-minute checklist:
- Duplicate the original SVG.
- Open the copy in an SVG path editor.
- Check the
viewBoxbefore editing. - Select the problem shape, not the whole file.
- Delete stray nodes or fragments first.
- Smooth one curve at a time.
- Avoid merging paths that need separate colors or hover states.
- Export the edited SVG.
- Compare original and edited versions at small and large sizes.
- Run conservative optimization only after the shape is correct.
The common mistake is treating every node as bad. A detailed icon can need many points. A bad path is not "a path with lots of nodes." A bad path is a path where the nodes make the file harder to render, edit, animate, recolor, or understand without improving the visible result.
Why do converted PNG files create messy SVG paths?
Converted PNG files create messy SVG paths because the converter is tracing pixel boundaries, not reading the designer's original vector intent. Anti-aliasing, shadows, JPEG compression, gradients, low resolution, and background noise can all become extra vector shapes.
That is why a traced logo often needs a different cleanup workflow than a Figma export. A Figma export usually has clean geometry with extra metadata. A traced PNG may have noisy geometry with thousands of small shapes.
Use this decision rule:
| Source File | Common Path Problem | Best Fix |
|---|---|---|
| Low-resolution PNG logo | Stair-stepped curves | Re-trace from a larger source or smooth key paths |
| JPG screenshot | Compression fragments | Use a cleaner source before tracing |
| Transparent PNG icon | Halo around edges | Remove stray paths and simplify the silhouette |
| Gradient illustration | Too many color bands | Reduce palette before vectorizing |
| Figma icon | Extra groups or IDs | Optimize markup and preserve the viewBox |
| AI-generated raster logo | Inconsistent outlines | Convert, then manually clean the main silhouette |
If the source is still available, improve the source before editing the SVG. Remove shadows, increase contrast, crop tightly, and export at a higher resolution. Then use Image to SVG or PNG to SVG again. Path editing is faster when the trace starts from a clean image.
After the paths look right, use the crop SVG online guide to trim excess transparent canvas without cutting off strokes, filters, or the cleaned silhouette.
When should I edit paths manually instead of using an optimizer?
Edit paths manually when the problem is visible: jagged edges, unwanted dots, broken corners, lumpy curves, overlapped shapes, or a silhouette that does not match the intended logo or icon. Use an optimizer when the SVG looks right but is too large or contains unnecessary metadata.
Here is the practical split:
- Manual path editing fixes what a human can see.
- SVG optimization fixes what the browser has to download and parse.
- Color editing fixes fill, stroke, gradients, and theming.
- Code editing fixes IDs, accessibility labels, animation hooks, and integration details.
This matters for web icons and product UI. If you merge paths too aggressively, the icon may become impossible to theme. If you remove IDs blindly, CSS animation or JavaScript targeting can break. If you crop the viewBox, the asset may align differently in buttons, nav bars, or app stores.
For a full compression workflow after manual cleanup, use the SVG path optimizer guide. For pure color edits, use the SVG color change guide.
How do I fix jagged curves in an SVG path?
To fix jagged curves in an SVG path, zoom into the problem edge, remove unnecessary points, and adjust the curve handles until the shape is smooth at both icon size and large preview size. Do not smooth the entire file at once unless the shape is simple and disposable.
A good curve usually has fewer points than a bad trace, but not always. The goal is controlled curvature, not the lowest possible node count.
Use this workflow:
- Identify the edge that looks wrong at the final display size.
- Select the path that owns that edge.
- Remove isolated points that create bumps.
- Convert sharp corners to smooth corners only where the design needs a curve.
- Adjust handles until the curve follows the intended silhouette.
- Check the file at 16px, 24px, 64px, and 512px.
- Export and compare against the original.
For logos, be conservative. A tiny curve change can affect brand recognition. For decorative illustrations, you can simplify more aggressively because exact geometry usually matters less than visual cleanliness.
What should I preserve when editing SVG paths?
Preserve anything the final page depends on: viewBox, accessibility labels, referenced gradients, masks, clip paths, IDs used by CSS or JavaScript, symbol structure, animation paths, and separate shapes that need different colors or interactions. A visually correct SVG can still be broken if those parts are removed.
Here is a quick safety table:
| SVG Part | Preserve When | Risk If Removed |
|---|---|---|
viewBox | Almost always | Cropping, scaling, alignment issues |
title and desc | SVG conveys meaning | Accessibility regression |
| IDs | CSS, JS, gradients, masks, or links use them | Broken styling or references |
| Separate paths | Different colors or interactions are needed | The file becomes hard to edit |
| Gradient definitions | Artwork uses gradients | Flat or missing fills |
| Clip paths and masks | Shape depends on clipping | Artwork spills outside bounds |
| Animation path structure | SVG is animated | Motion or morphing breaks |
If you are not sure whether an ID or definition is used, search the SVG code before deleting it. A referenced gradient might look like fill="url(#paint0_linear)". Delete that definition and the shape can render black, transparent, or not at all depending on the browser.
Can I edit SVG paths without Illustrator, Figma, or Inkscape?
Yes. You can edit many SVG paths without Illustrator, Figma, or Inkscape if the job is focused: remove fragments, adjust fills and strokes, fix a few curves, inspect the viewBox, or clean a traced icon. Full vector editors are better when you are drawing new artwork or doing complex illustration work.
Use a browser SVG editor when:
- you already have the SVG file
- the edit is small and visual
- you need a quick export
- you do not want to install desktop software
- you are cleaning an asset for a website, app, or logo handoff
Use a full vector editor when:
- you need pen-tool drawing from scratch
- you are rebuilding a complex illustration
- you need typography, layout, or advanced boolean operations
- you need exact brand-design control across many artboards
- you are preparing print production files
For the common website workflow, a browser editor is enough: convert the source image with Image to SVG, clean the result in SVG Editor, change colors if needed with SVG Color Changer, then optimize the final file.
What is the best workflow for editing traced SVG logos?
The best workflow for editing traced SVG logos is source cleanup, conversion, path cleanup, color cleanup, optimization, and final page testing. Do not start by optimizing the raw trace. Remove visible noise and fix the silhouette first, because compression cannot decide what the logo is supposed to look like.
Use this sequence:
- Start with the highest-resolution logo source available.
- Remove background noise before tracing.
- Convert the image to SVG.
- Delete stray edge fragments.
- Smooth only the curves that look wrong.
- Recolor the main fills and strokes.
- Preserve the
viewBox. - Optimize the final SVG conservatively.
- Test on light and dark backgrounds.
- Save the original and edited versions separately.
This is especially useful for AI-generated logos, old PNG brand files, screenshots from decks, and client logos that arrived without source files. If the trace is too messy, stop and regenerate or re-convert from a better image. Editing a bad trace for an hour is usually worse than spending five minutes improving the source.
FAQ
What is the fastest way to edit SVG paths online?
Open the SVG in a path editor, select the problem shape, simplify or remove only the noisy nodes, preserve the viewBox, then export and compare the result against the original. Do not flatten the whole file unless you no longer need separate shapes, IDs, or animation hooks.
Can I edit SVG paths without Illustrator?
Yes. A browser-based SVG path editor can handle common cleanup jobs such as moving anchor points, smoothing jagged curves, deleting fragments, changing fills and strokes, and exporting the updated SVG. Use Illustrator, Figma, or Inkscape when you need full illustration tools.
Why does my converted PNG have so many SVG paths?
Raster-to-vector conversion traces color boundaries from pixels. A low-resolution, compressed, shadow-heavy, or textured source image can become hundreds or thousands of tiny paths. Simplify the source image first, then edit the traced SVG paths that affect the visible shape.
Should I simplify SVG paths before or after editing?
Edit obvious design problems first, then run conservative optimization. If you optimize first, noisy fragments may merge into harder-to-select shapes. If you over-edit manually, you can accidentally change the silhouette before the optimizer gets a clean pass.
How do I know if an SVG path edit is safe?
A safe edit keeps the visible shape, viewBox, gradients, masks, IDs used by CSS or JavaScript, accessibility labels, and responsive behavior intact. Compare the file at icon size, large size, light mode, dark mode, and inside the page where it will be used.
Create your own SVG graphics with AI
Describe what you need, get a production-ready vector in seconds. No design skills required.
About This Article
This article was written by SVG Genie Team based on hands-on testing with SVG Genie's tools and years of experience in vector design and web graphics. All recommendations reflect real-world usage and are reviewed by the SVG Genie editorial team for accuracy.
About the Author
SVG Genie Team
SVG Design Expert & Technical Writer at SVG Genie
SVG Genie Team is a vector design specialist and technical writer at SVG Genie with years of hands-on experience in SVG tooling, AI-assisted design workflows, and web graphics optimization. Their work focuses on making professional vector design accessible to everyone.
More articles by SVG Genie Teamarrow_forward